Untitled
 The iTalk Voice Recorder allows you to capture audio anywhere. It is important to ask others around you permiss to record their voices and the iTalk should not be used where audio recording has been prohibited.
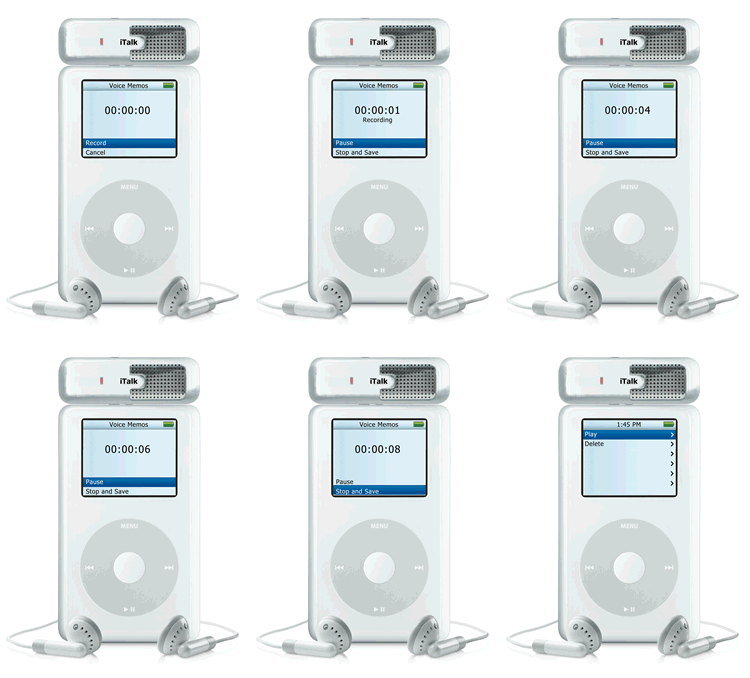
Here are the steps:
- Plug you iTalk into the top of your iPod.
- Click the center button to begin Recording.
- Click Pause or Stop and Save.
Some of you may want to share your audio recordings, some of you may be required in your classes to submit audio recordings as assignments or for assessment purposes. If this is the case, you will need to download your recording from your iPod into iTunes and then you may need to upload the recording to your Segue class site.
Uploading Voice Memos to iTunes
Once you have a recording on your iPod, you will need to transfer it to a computer using iTunes. Here are steps:
- Connect your iPod to a computer with iTunes (Wilson Media Lab or Library 105 or your own computer)
- iTunes will ask you if you wish to copy your Voice Memo to the iTunes Music Library. Click Ok button to do this.
- Locate your Voice Memo (e.g. your audio recording) in the Voice Memo playlist in iTunes
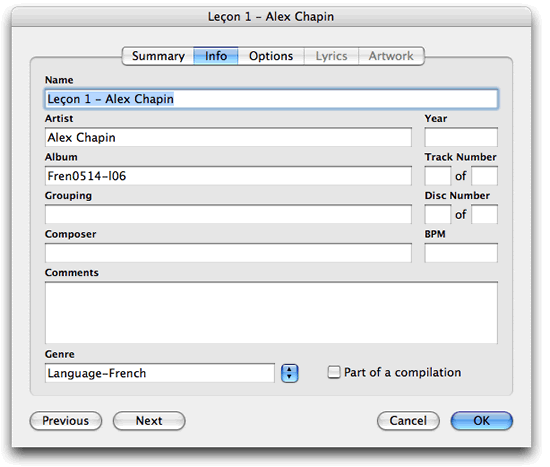
Once you have found your Voice Memo in iTunes you will need to add metadata to it. Here are the steps:
- Select your Voice Memo (its default name will be the date and time you did recording)
- Chose File > Get Info
- Add appropriate information in fields. Use the Name field for information about the Voice Memo itself. Use the Artist field to indicate whose Voice Memo it is or whose Voice has been captured in the Voice Memo. Use the Album field to indicate the lesson to which the Voice Memo belongs, or the Assignment it fulfills or the event of which the memo is a part of…. Use the Comments field for additional information, perhaps feedback if it is an assignment, perhaps textbook page number to which the memo corresponds…
Example: If the recording is for a class assignment, the metadata may take the following form:
Name: The name of the recording should be the lesson or assignment name and should also include your name
Artist: your name
Album: fren0514-l06
Genre: Language-French

Converting Voice Memo to MP3 Format
- Select the Voice Memo you want to convert to .mp3 format
- Choose Advanced > Convert Selection to MP3
if your iTunes does NOT have an Advanced > Create MP3 version, do the following:
- Open iTunes > Preferences
- Change your Import settings to MP3 Encoder
Convert Selection to MP3 creates a copy of voice memo with an identical name. If you convert your voice memo to MP3 from your Voice Memos playlist, the MP3 version will not appear in this list and you will need to locate the mp3 version in your library. You should be able to find it by searching for its name in the iTunes search UI or looking in the Recently added playlist.
Tip: Sort your iTunes library by Date Added to see most recently added or created files. The MP3 version of your voice memo will appear near the top of this list.
Uploading Voice Memos to Segue
Once your Voice Memo has meta data and has been converted to MP3 format, you can upload it to Segue (or any other website). Here are the steps:
 Locate the MP3 version of your Voice Memo in the Recently Added playlist or by searching for its name in the iTunes search
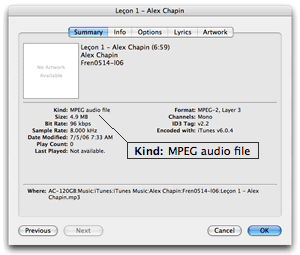
You should see 2 tracks with identical names. One is the original Voice Memo (WAV audio file and the other is the MP3 version (MPEG audio file). To determine which is the right one do the following:
1. Select one of them and chose File > Get Info.
2. Select the Summary tab and look for Kind: MPEG audio file- Drag the MP3 version of your Voice Memo from iTunes to your desktop (or to a subdirectory or folder on your hard drive)
- Go your to your Segue site (or any other site…)
- Upload your MP3 Voice Memo to your Segue site as follows:
- Go into Edit Mode in Segue (click on Edit This Site button at bottom of page)
- Chose to + add content on the Segue page you want to make your Voice Memo accessible
- Chose File for Download and upload your Voice Memo according to the instructions in Segue
Including Voice Memos in Segue Discussion/Assessment
Once your Voice Memo has been uploaded to Segue and included in a Segue content block, you make this Voice Memo the object of discussion and/or assessment as follows:
- Create (or edit) a Segue content block that includes an audio file
- Click on link to Discuss/Assess
- Chose to Enable discussion/assessment and any other discuss/assess settings that are appropriate

Since Segue’s Discussion/Assessment module allows participants to attach files to their discussion or assessment posts, Segue can be used as a means of discussing or assessing audio material. Chose Segue’s Assessment option to allow for a one to one feedback of audio material that is submitted by students. In this mode, students see only their own posts and any reply to their posts made by the instructor. The instructor can also rate (or grade) the audio material using the rating option.
Alternatively chose Segue’s Discussion option to allow students to share their audio material…