Glucose in Natural Products

Introduction

Structure of D-glucose

Structure of D-glucose

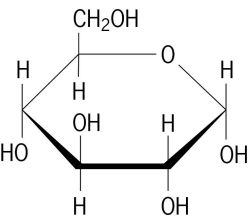
As the world’s most common biomolecule, glucose (C6H12O6) has numerous cellular functions including serving as a metabolic fuel, as a precursor to energy storage molecules such as starch and glycogen, and as a building block molecule to important structural components such as cellulose. Glucose is a simple sugar or monosaccharide, meaning it contains a carbonyl group (C=O) along with several hydroxyl (-OH) groups. It is just one of many natural molecules that fall in the simple sugar class (fructose, galactose, ribose are others); these vary by the number of carbons and hydroxyls and by the spatial arrangement of the –OH groups around the carbons. Due to the multiple hydroxyl groups, monosaccharides are highly soluble in water.


In this laboratory, you and your partner will design a research plan to investigate the glucose levels in a system of your choosing. The study should not be a simple comparison of the glucose levels in two different, unrelated products; you should instead design the experiment to ultimately “tell a story” relating the glucose levels to something about the 18430036-Vector-illustration-of-Cartoon-Scientist-Stock-Vector-scienceproducts. For example, an appropriate title of your project may be “An Investigation of the Comparative Glucose Concentrations of Two ____(fill in the blank)_________.” You can pick different products to compare or you might want to pick one product which somehow gets manipulated (temperature, storage, etc.). The plan obviously needs some discussion and some preliminary research of the literature (i.e., Does the product you intend to use actually have glucose in it?). Creativity is admired. The experiment cannot include the use of animals nor the use of human body fluids. The lab instructor will work with you to determine the feasibility of the project.

Analysis of Glucose

A spectroscopic procedure will be made available to you to determine the glucose levels in your samples. Like all simple sugars, glucose does not absorb light in the visible range. We will therefore need to use a combination of reagents to generate colors that are proportional to the amount of glucose in solution. Here, the mixture of reagents includes phenol, aminoantipyrine, glucose oxidase (GO), and horseradish peroxidase (HRP); these oxidize glucose while simultaneously producing a rose-colored product that absorbs light at 505 nm.

The important aspect of this procedure is that the absorbance produced at 505 nm in this reaction is proportional to the amount of glucose you add to the reagent mixture. The instructions on how to perform the analysis is at the end of this write-up. In olden days, chemistry was mostly done using sight and smell as the analytical tools. For example, if you worked as a chemist for Gatorade in the mid-1800s, you would have to use your eyeballs to adjust the color of Gatorade XTREMO Tropical Intensio. Late in the 1800s, the colorimeter was invented by …. uh, uh, … John Colorimeter…? and it proved useful in comparing the colors of two solutions (one being a standard) and was a blessing for the colorblind chemist. The unit used sunlight as the light source and colored filters to select a particular light type. In the 1940s, Arnold Beckman and his associates in what was later to become the Beckman Instrument Co. developed and highly commercialized the first ultraviolet/visible spectrophotometer, a unit that used bulbs as a light source, a prism to select a desired wavelength, and a phototube to measure the light that made it through the sample. You are already familiar with the spectrophotometer, the concept of absorbance, and Beer’s Law.

Procedure for Determination of Glucose

The following procedure is appropriate for glucose concentrations in the 0 – 2.0 g glucose/L range. If your sample has a glucose concentration higher than this value, the solution will need to be diluted and this dilution will need to be factored back in when figuring out the original solution’s concentration.
Since the intensity of color that a given amount of glucose will generate by this procedure is unknown, you will need to prepare some glucose standards and run them in the procedure to generate a [glucose] vs Absorbance standard relationship. (It should be linear.) Prepare a 2.0 g/L glucose solution using crystalline glucose. Using this solution and test tubes, prepare a group of standards (volume = 4.0 mL) in the range 0 – 2.0 g glucose/L. These samples should be spread out fairly evenly throughout the range and should include a 0.0 g/L sample and a 2.0 g/L sample. A typical standard relationship is typically generated with four or five samples throughout this range.

To perform the procedure, set the spectrophotometer to 505 nm. In the cuvette (sample holder) add 1.0 mL of the color reagent and 0.10 mL of your standard or sample. Using a piece of Parafilm, flip the cuvette quickly to mix, put it immediately into the spectrophotometer, and start monitoring the rise in absorbance. Measure the absorbance change over a two-minute period. It is the rate of absorbance change at 505 nm that should be proportional to glucose concentration. You will need to prepare an Excel graph that shows the relationship of absorbance increase to the glucose concentration. Let Excel determine the slope of the line and the correlation coefficient (R2) of the fit. Before leaving the laboratory, look at your data closely. If a point on your relationship seems off, you may want to re-run that standard.

You should run your samples in the same way as you ran the standards, i.e., 1.0 mL of the color reagent to 0.10 mL of sample. For accuracy the rate you obtain for your sample needs to be in the range of the rates you measured for the standards. If it the rate is too high, perform a dilution on the sample and re-run the procedure on the diluted sample. (Again, you will then need to back-calculate to the concentration of the sample by knowing this dilution.)

Final Report

Upon completing the analysis, you and your partner should combine to put together a report on your findings using a typical journal format of:

  • Title: specific, descriptive, concise;
  • Abstract: short summary of what you did, why, and what you found;
  • Introduction:
    • include appropriate background (such as how a spectrophotometer works, how the spectrophotometry data will help you answer your question, and the reaction you are using to detect glucose, the Trinder glucose activity test);
    • introduction of the question (such as why you think it is interesting, and what you think will be the outcome and why);
  • Experimental Procedures: in narrative form because this is a formal report, and specific enough for someone to repeat it exactly how you did it;
  • Results: well-formatted tables and/or graphs with captions. Show all of your raw data in whatever form is clearest;
  • Discussion: show and explain how you used your raw data to find the answer (such as plotting your calibration curve and sample data together). Give a detailed, logical argument leading to your final answer of how much glucose is in your sample (either in terms of %wt or g/mL concentration of your full strength solutions). Compare your findings to your hypothesis and attempt to explain any discrepancies. If possible, compare your answer to a cited literature value;
  • Conclusion: the answer you came up with and a summary of how you solved the problem. Discuss possible sources of error that lead to uncertainties about the accuracy of your conclusion. Suggest a future experiment that would continue this work.

Note: this is a formal scientific writing assignment. Grammar and spelling count. Please proof-read your work before submitting it.

Format: Section headers are recommended. Citations must be formatted appropriately. You may want to take a look at a biochemistry or chemistry journal paper to see a properly formatted paper and/or consult the ACS style guide. I will gladly proof-read your papers, but you must show me your draft at least a week before it is due because it may take me a few days to read through it.

Turn in your report electronically with Canvas.

Spectrophotometric Determination of Iron

by E. L. Pool and D. Copeland (with edits by R. Sandwick and M. J. Simpson)

Learning Goals

  1. Practice handling hazardous chemicals safely;
  2. Use a bunsen burner to heat a solution;
  3. Vacuum filter a solution;
  4. Practice using a transfer pipet and a mortar and pestle;
  5. Manipulate experimental conditions to illustrate the concept of limiting and excess reagents;
  6. Use Beer’s Law to create and apply a calibration curve for quantitative analysis;
  7. Consider the consequences of the limitations of the spectrophotometer and the analytical balance.

Introduction

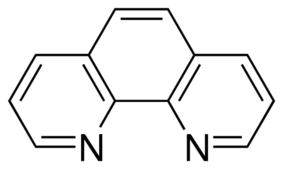
You will use spectrophotometry to determine the amount of iron in a multivitamin to see if the manufacturer’s claim is correct. Iron itself is not a huge absorber of light, but when it (in solution in the Fe2+ form) binds to 1,10 phenanthroline (C12H8N2), it forms a highly stable red/orange-colored species. By quantifying the color with spectrophotometry, we can deduce the concentration of iron in the solution and back-calculate the amount of iron in the original pill. This can be compared to the manufacturer’s claim.

phenanthroline1,10 Phenanthroline

Background

The formation of the red/orange-colored iron-phenanthroline complex requires the iron to be in the Fe2+ form, and the procedure thus includes the reagent hydroxylamine hydrochloride (NH2OH ● HCl) that will reduce all iron in the sample to the ferrous form. Sodium acetate (NaC2H3O2) is used to control the pH of the solution since this also affects the absorbance.

The red/orange iron-phenanthroline complex absorbs light at 508 nm, which is green light. This should make sense if you remember the Kool-Aid lab. To quantify the intensity of the color, you can use the spectrophotometer to measure the “absorbance.”

A key assumption in this experiment is that all of the iron will be converted to the colored complex, meaning there must be excess phenanthroline present. In preparation for the experiment, you will analyze the effects of varying the amounts of the two reagents that are directly involved in the production of the colored complex: the iron and the phenanthroline. This will show you the conditions under which this assumption is valid (or not!).

Once you measure the absorbance of the pill solution, how will you know how to correlate the absorbance with a concentration?  One way is to know the extinction coefficient and to plug the appropriate numbers into Beer’s law. Another way is to prepare iron standards and to generate a standard curve of absorbance versus iron concentration. This latter technique is preferred as it accounts for any small changes one might have in her/his particular laboratory situation. We will use this method in our iron determination.

An online tutorial of this lab is available here.

Procedure

Note: do this lab with a partner.

Sample (Unknown) Preparation

The sample preparation requires crushing a pill, boiling the powder in acid to release the iron, and filtering the solution to remove particulates that could interfere in the spectrophotometry measurements.

  1. Each pair should obtain one vitamin pill. Determine the mass of the pill. Using a mortar and pestle, crush the pill into a fine powder. (You can take your angst out on the pill, but be careful none of it escapes the mortar.) Transfer the pulverized pill powder quantitatively to a 400 mL beaker. Determine the mass of the powder. In your final calculations, you will need to scale up your final iron concentration in the pill to account for any powder that you did not use.

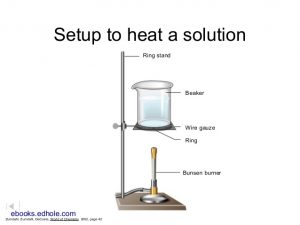
    Apparatus to heat a solution

  2. Add approximately 150 mL of 1.0 M hydrochloric acid (HCl) [CAUTION!]. Add a few boiling chips. Use an apparatus similar to the illustration to heat the solution to near boiling (simmer) and keep heating at that temperature for 10 minutes. Do not leave your solution unattended. Avoid loss by splattering. Record observations about the appearance of your solution.
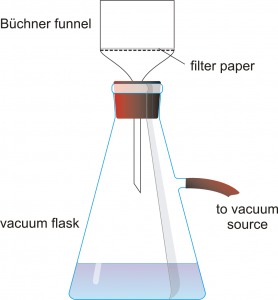
  3. Set up a vacuum filter apparatus with a Buchner filter, a vacuum flask, and a piece of filter paper. Hold the flask firmly or clamp it to a ringstand so it does not tip over. Pour 50 mL of DI water through the filter first, then turn on the vacuum and pour the hot solution through the filter. Your final solution should be clear and yellow. Record observations about the clarity of your solution in Table 3.
  4. Pour the filtered solution into a volumetric flask. Dilute to exactly 1.000 L with distilled water and mix thoroughly.

Solution Preparation

  1. Label 7 clean test tubes with the concentration of iron that they will contain (in units of mg/L): 0, 5, 10, 15, 20, 25, and the unknown vitamin solution.
  2. Label 4 small beakers with the reagents you will acquire from the stock solutions: sodium acetate, hydroxylamine HCl, 1,10-phenanthroline, and DI water. Fill these beakers with about 10 mL of their respective reagent. Put a plastic pipet in each. 
  3. To each test tube, add 1 mL of each: sodium acetate, hydroxylamine HCl, and 1,10-phenanthroline. Note: you are using a concentrated phenanthroline solution that ensures it is in GREAT excess.
  4. To each test tube, add appropriate amounts of water and/or 25 mg/L iron stock solution to make a total of 5 mL of the concentration of iron specified on the label. Record the amounts of water and iron stock solution you used in Table 4. In the vitamin solution test tube, put 5 mL of the vitamin solution. 
  5. Mix test tubes with gentle agitation and let the reaction complete for 10 minutes. Although you should use this time wisely, I advise against cleaning up, as you may need to remake a solution or two before the lab ends.
  6. Record observations about the color change and any trends you notice in Table 4. Note in your observations what concentration iron solution appears most similar to your vitamin sample. Pro-tip: these qualitative measurements should agree with your quantitative spectrophotometric measurements that you make in the next step. Your eyes are good spectrophotometers, and something is probably wrong if the quantitative measurements disagree with your visual inspection.

Spectrophotometric Analysis

  1. Get 7 clean cuvettes in a cuvette tray. Label them with the concentration of iron that they will contain (in units of mg/L): 0, 5, 10, 15, 20, 25, and the unknown vitamin solution. Transfer approximately 1 mL of each solution from its test tube to its corresponding cuvette.
  2. Using a Spectronic 401 at 508 nm, read and record the Absorbance (A508) of your solutions. Record this data into Table 4.

Clean up

Check that your data in Table 4 increases linearly from low concentration of iron to high concentration of iron before cleaning up any part of your experiment. Ask your TA for help neutralizing the pill solution, then pour it down the drain. Pour the contents of the test tubes and cuvettes into the waste container. Throw away the cuvettes.

Data Analysis

The absorbance measurements of the standard solutions are used to determine the concentration of iron in the pill solution, which is used to determine the amount of iron present in the original pill. You can plot the concentration versus absorbance, then perform linear regression to find the formula that relates concentration and absorbance.

With this formula, you can simply plug in the pill solution absorbance and calculate the unknown concentration of iron in the pill solution. Using the concentration of iron in the pill solution, calculate the amount of iron present in the original pill. (Note: you will have to scale up your value to account for mass lost between the original pill and the pill powder.) You can then compare this value to the amount listed on the bottle in terms of percent error. The percent error is the absolute difference between the experimental and theoretical value divided by the theoretical value, then multiplied by 100 to get a percent.

Report

Fill out this worksheet. Turn in either a paper or digital copy. Optional survey.

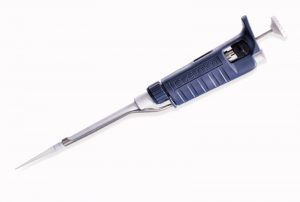
Micropipette

During the semester you will make use of Pipetman® micropipettors.  When used properly, these units deliver very accurate volumes (errors less than 1%) and they are amazingly fast.  However, please recognize that micropipettors will give erroneous volumes when in the hands of someone who is careless or not operating them correctly.  Some important suggestions/comments for the micropipettor user:

  1. The working range for a micropipettor is generally from the upper value given (here 1000 mL or 200 mL) down to 1/10th of that volume. Do not go outside this range.  Micropipettors are more accurate at the upper volume and less accurate at the lower volume.  Thus it is better to pipette 200 mL with a P200 than a P1000.
  2. Dial the micropipettor to the volume desired and firmly put on a tip. Push the plunger down to the first stop and place the tip below the surface of the liquid a bit. Slowly let the plunger come up (i.e., buffer its movement with your thumb). Place the tip into the receptacle where you want to dispense the liquid.  Push the plunger down to the first stop and then to the second stop to expel the final amount.  To remove the tip, push all the way down.
  3. Some don’ts:
    • Don’t have the tip too close to the surface of the water or else you’ll draw up air rather than liquid (creating the wrong volume).
    • Don’t bring liquid up into the tip at such a fast rate that liquid gets into the micropipettor itself. This will damage the micropipettor.
    • Don’t pipette strong acids/bases or organic solvents with a micropipettor.
    • Don’t leave the micropipettor close to the edge of a bench where it can be knocked off and fall on the floor.
    • Don’t invert the micropipettor with liquid in it (the liquid will enter the pipettor) or lay the pipettor down with liquid in the tip. Always keep the pipettor vertical.

      micropipette

      micropipette


    • This webpage gives lots of helpful information on micropipettes.
    • Here is a video showing the proper use of a micropipette: