Introduction

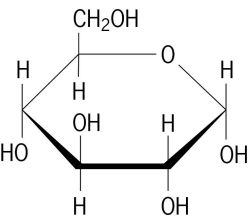
Structure of D-glucose
As the world’s most common biomolecule, glucose (C6H12O6) has numerous cellular functions including serving as a metabolic fuel, as a precursor to energy storage molecules such as starch and glycogen, and as a building block molecule to important structural components such as cellulose. Glucose is a simple sugar or monosaccharide, meaning it contains a carbonyl group (C=O) along with several hydroxyl (-OH) groups. It is just one of many natural molecules that fall in the simple sugar class (fructose, galactose, ribose are others); these vary by the number of carbons and hydroxyls and by the spatial arrangement of the –OH groups around the carbons. Due to the multiple hydroxyl groups, monosaccharides are highly soluble in water.
In this laboratory, you and your partner will design a research plan to investigate the glucose levels in a system of your choosing. The study should not be a simple comparison of the glucose levels in two different, unrelated products; you should instead design the experiment to ultimately “tell a story” relating the glucose levels to something about the  products. For example, an appropriate title of your project may be “An Investigation of the Comparative Glucose Concentrations of Two ____(fill in the blank)_________.” You can pick different products to compare or you might want to pick one product which somehow gets manipulated (temperature, storage, etc.). The plan obviously needs some discussion and some preliminary research of the literature (i.e., Does the product you intend to use actually have glucose in it?). Creativity is admired. The experiment cannot include the use of animals nor the use of human body fluids. The lab instructor will work with you to determine the feasibility of the project.
Analysis of Glucose
A spectroscopic procedure will be made available to you to determine the glucose levels in your samples. Like all simple sugars, glucose does not absorb light in the visible range. We will therefore need to use a combination of reagents to generate colors that are proportional to the amount of glucose in solution. Here, the mixture of reagents includes phenol, aminoantipyrine, glucose oxidase (GO), and horseradish peroxidase (HRP); these oxidize glucose while simultaneously producing a rose-colored product that absorbs light at 505 nm.
The important aspect of this procedure is that the absorbance produced at 505 nm in this reaction is proportional to the amount of glucose you add to the reagent mixture. The instructions on how to perform the analysis is at the end of this write-up. In olden days, chemistry was mostly done using sight and smell as the analytical tools. For example, if you worked as a chemist for Gatorade in the mid-1800s, you would have to use your eyeballs to adjust the color of Gatorade XTREMO Tropical Intensio. Late in the 1800s, the colorimeter was invented by …. uh, uh, … John Colorimeter…? and it proved useful in comparing the colors of two solutions (one being a standard) and was a blessing for the colorblind chemist. The unit used sunlight as the light source and colored filters to select a particular light type. In the 1940s, Arnold Beckman and his associates in what was later to become the Beckman Instrument Co. developed and highly commercialized the first ultraviolet/visible spectrophotometer, a unit that used bulbs as a light source, a prism to select a desired wavelength, and a phototube to measure the light that made it through the sample. You are already familiar with the spectrophotometer, the concept of absorbance, and Beer’s Law.
Procedure for Determination of Glucose
The following procedure is appropriate for glucose concentrations in the 0 – 2.0 g glucose/L range. If your sample has a glucose concentration higher than this value, the solution will need to be diluted and this dilution will need to be factored back in when figuring out the original solution’s concentration.
Since the intensity of color that a given amount of glucose will generate by this procedure is unknown, you will need to prepare some glucose standards and run them in the procedure to generate a [glucose] vs Absorbance standard relationship. (It should be linear.) Prepare a 2.0 g/L glucose solution using crystalline glucose. Using this solution and test tubes, prepare a group of standards (volume = 4.0 mL) in the range 0 – 2.0 g glucose/L. These samples should be spread out fairly evenly throughout the range and should include a 0.0 g/L sample and a 2.0 g/L sample. A typical standard relationship is typically generated with four or five samples throughout this range.
To perform the procedure, set the spectrophotometer to 505 nm. In the cuvette (sample holder) add 1.0 mL of the color reagent and 0.10 mL of your standard or sample. Using a piece of Parafilm, flip the cuvette quickly to mix, put it immediately into the spectrophotometer, and start monitoring the rise in absorbance. Measure the absorbance change over a two-minute period. It is the rate of absorbance change at 505 nm that should be proportional to glucose concentration. You will need to prepare an Excel graph that shows the relationship of absorbance increase to the glucose concentration. Let Excel determine the slope of the line and the correlation coefficient (R2) of the fit. Before leaving the laboratory, look at your data closely. If a point on your relationship seems off, you may want to re-run that standard.
You should run your samples in the same way as you ran the standards, i.e., 1.0 mL of the color reagent to 0.10 mL of sample. For accuracy the rate you obtain for your sample needs to be in the range of the rates you measured for the standards. If it the rate is too high, perform a dilution on the sample and re-run the procedure on the diluted sample. (Again, you will then need to back-calculate to the concentration of the sample by knowing this dilution.)
Final Report
Upon completing the analysis, you and your partner should combine to put together a report on your findings using a typical journal format of:
- Title: specific, descriptive, concise;
- Abstract: short summary of what you did, why, and what you found;
- Introduction:
- include appropriate background (such as how a spectrophotometer works, how the spectrophotometry data will help you answer your question, and the reaction you are using to detect glucose, the Trinder glucose activity test);
- introduction of the question (such as why you think it is interesting, and what you think will be the outcome and why);
- Experimental Procedures: in narrative form because this is a formal report, and specific enough for someone to repeat it exactly how you did it;
- Results: well-formatted tables and/or graphs with captions. Show all of your raw data in whatever form is clearest;
- Discussion: show and explain how you used your raw data to find the answer (such as plotting your calibration curve and sample data together). Give a detailed, logical argument leading to your final answer of how much glucose is in your sample (either in terms of %wt or g/mL concentration of your full strength solutions). Compare your findings to your hypothesis and attempt to explain any discrepancies. If possible, compare your answer to a cited literature value;
- Conclusion: the answer you came up with and a summary of how you solved the problem. Discuss possible sources of error that lead to uncertainties about the accuracy of your conclusion. Suggest a future experiment that would continue this work.
Note: this is a formal scientific writing assignment. Grammar and spelling count. Please proof-read your work before submitting it.
Format: Section headers are recommended. Citations must be formatted appropriately. You may want to take a look at a biochemistry or chemistry journal paper to see a properly formatted paper and/or consult the ACS style guide. I will gladly proof-read your papers, but you must show me your draft at least a week before it is due because it may take me a few days to read through it.
Turn in your report electronically with Canvas.
