Lab documentation

During the semester you will be asked to develop various aspects of your scientific record keeping and report writing. These talents will hopefully be expanded and built upon during subsequent chemistry and other science lab courses. The exact documentation requested for each laboratory exercise is explained at the end of each experimental write-up.

Preparation for an Experiment

Before you arrive in the laboratory to perform a given experiment it is essential that the experiment be studied carefully, with special emphasis on the overall experimental design and on the general flow of the procedure. The laboratory will run smoother and more safely if everyone arrives prepared.  Occasionally, it will be necessary to make changes in a given procedure. These changes will be brought to your attention early in the lab period; please note them immediately in the appropriate place in this manual.

Prior to starting an experiment, a researcher will often clearly record her/his objectives in an attempt to clearly define the purpose of the experiment in order to best design procedures that can achieve these purposes. We will ask you to prepare for each laboratory experiment by reading the lab handout and then by writing a short objectives section prior to arrival at lab.   A sample objective section for an experiment might be:

Experiment 1

Volume Calibration of a Kimax Buret and Density of a Metal

Objective
In this laboratory, I am going to establish a calibration curve for a 50.0 mL buret.  Each buret is slightly different and the volumes they deliver may or may not agree with the volume markings.  I will determine this by dispensing volumes from the buret and then correlating these volumes to their actual volumes by weighing the dispensed amounts and converting the determined mass to volume by knowing the density of water at room temperature. (This value is 0.998204 g/mL.)  Linear regression will be used to statistically treat the data. In the second portion of the experiment I will determine the density of a metal by measuring its volume and mass.  Again, the data will be treated statistically to determine the accuracy of my measurements.

Laboratory Notebook Report

For at least one laboratory, you will be asked to prepare and submit a document in the form of a laboratory notebook. In official laboratories (for example, industrial or research labs) where documentation is critical, it is customary to record experimental events directly into a bound notebook with dated and numbered pages.  The flow of information for a particular experiment should tell a story – it should have an opening, a plot, and a conclusion.  When complete, the documentation should provide a second reader a clear understanding of what happened in the experiment and should include all the necessary information to permit the reader an opportunity to repeat and validate the experiment.  Through the years, the scientific community has established a standard sequence to laboratory reports; it is:

  1. Title: A concise, specific, and descriptive title for the experiment.
  1. Objectives: A brief statement about the experiment and what you plan to accomplish (what you wish to accomplish) in the experiment. Your objective is not “to learn how to….” but to do something. (See example.)
  1. Procedure: A list or narrative of the steps you did in performing the experiment. Your experimental record should be complete enough to permit someone else to perform the same experiment in the same way.
  1. Observations: Your record of measured data and observations.
  1. Results: A section where results are calculated and presented in tabular form.
  1. Discussion:  A section to show how you analyzed your results and to present a discussion that eventually leads to a conclusion.
  1. Conclusions: A final paragraph should summarize the conclusions of the study. This section is also where you can mention future work that you would like to do to follow-up this experiment and where you can discuss errors and uncertainties associated with your results and conclusions.

Instead of a notebook we will provide worksheets. You should treat these write-up sheets as your laboratory notebook for these experiments. All primary data should be recorded directly onto your write-up as you do the experiment.

For one laboratory report (the glucose lab), you will be asked to prepare a report in scientific journal form.  You should review chemistry journal articles in preparation for preparing this report to see what needs to be included and how data are presented.

Micropipette

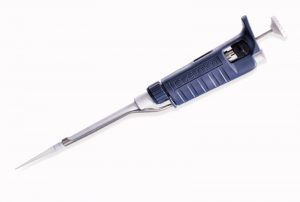
During the semester you will make use of Pipetman® micropipettors.  When used properly, these units deliver very accurate volumes (errors less than 1%) and they are amazingly fast.  However, please recognize that micropipettors will give erroneous volumes when in the hands of someone who is careless or not operating them correctly.  Some important suggestions/comments for the micropipettor user:

  1. The working range for a micropipettor is generally from the upper value given (here 1000 mL or 200 mL) down to 1/10th of that volume. Do not go outside this range.  Micropipettors are more accurate at the upper volume and less accurate at the lower volume.  Thus it is better to pipette 200 mL with a P200 than a P1000.
  2. Dial the micropipettor to the volume desired and firmly put on a tip. Push the plunger down to the first stop and place the tip below the surface of the liquid a bit. Slowly let the plunger come up (i.e., buffer its movement with your thumb). Place the tip into the receptacle where you want to dispense the liquid.  Push the plunger down to the first stop and then to the second stop to expel the final amount.  To remove the tip, push all the way down.
  3. Some don’ts:
    • Don’t have the tip too close to the surface of the water or else you’ll draw up air rather than liquid (creating the wrong volume).
    • Don’t bring liquid up into the tip at such a fast rate that liquid gets into the micropipettor itself. This will damage the micropipettor.
    • Don’t pipette strong acids/bases or organic solvents with a micropipettor.
    • Don’t leave the micropipettor close to the edge of a bench where it can be knocked off and fall on the floor.
    • Don’t invert the micropipettor with liquid in it (the liquid will enter the pipettor) or lay the pipettor down with liquid in the tip. Always keep the pipettor vertical.
      micropipette

      micropipette


    • This webpage gives lots of helpful information on micropipettes.
    • Here is a video showing the proper use of a micropipette:

Titration

Besides mass measurements, bureting/pipetting are the other techniques that you will frequently be doing in the laboratory.  A titration is the gradual addition of a known volume of one reagent (the titrant) to another reactant until the observed completion of a chemical reaction.  Typically, an indicator is employed to signal the complete consumption of the reactant in the flask.  A proper titration allows an individual to determine when a stoichiometric amount of the two reagents has reacted.

Buret

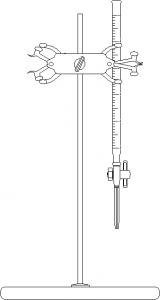
A buret mounted on a clamp

Volume measurements in a titration are done using a buret.  A buret is a precisely manufactured glass tube with graduations that allow volume of liquid delivered through a stopcock to be precisely measured.  The 50.0 mL Class A buret used in the laboratory has been certified to deliver volumes to a tolerance of 0.1% of the total volume or in our case ±0.05 mL. The calibrated volume is valid only if the glassware is scrupulously clean because only a clean surface will support a uniform film of liquid need for accurate delivery.  Breaks in this film, for example the formation of droplets on the inner surface, are an indication of dirty glassware.  If liquid does not drain evenly down the wall of the, it needs to be cleaned.  Calibrated glassware may be cleaned with a warm detergent solution (Alconox, use only detergents designed to clean glassware because they are designed not to leave a film on the glass).  After the glassware is cleaned, it should be rinsed thoroughly with distilled water.

Reading the liquid level in a buret is a straight forward task.  The bottom of the meniscus is normally read.  Reading is aided by a white card – containing a dark area – placed in back of the meniscus.  When the card is held so that the white part is above the meniscus and the darkened portion is slightly below the meniscus, the meniscus will appear darkened and easier to observe.  Your eye must be level with the meniscus to avoid parallax error.  If viewed from above, the reading will appear lower, whereas, if viewed from below, it will appear higher. For our burets with a 0.1 mL graduation you should read to ±0.05 mL. Because this last digit falls between the divisions it will have to be estimated but with practice you should be able to do this quite accurately.

Sources of error in buret use:

  • a dirty buret that does not drain evenly
  • an air bubble in the stopcock of buret tip
  • parallax errors
  • delivering the liquid too rapidly so that liquid on the side does not have time to drain
  • not reading the buret properly

Use of a Buret

  1. Add 5 to 10 mL of the titrant, rotating to wet the interior completely, then drain. Repeat.
  2. Make sure the buret is clamped in a perfectly vertical position.
  3. Fill the buret to above the zero mark and drain some solution to free the buret tip of bubbles.
  4. Drain the solution to the zero mark and record the starting reading after 1 min. You don’t have to be at precisely zero but you do have to precisely record the initial reading.
  5. With the tip well within the titration vessel, begin draining the buret solution into the stirred sample, slowing the rate of addition to a drop at a time near the endpoint of the titration.
  6. When the endpoint is reached, rinse the tip off into the vessel, rinse the sides of the vessel, then wait 30 seconds and record to ±0.05 mL.


To deliver volume increments smaller than a normal drop (±0.03 mL) allow a partial drop to form and then rinse the partial drop into the titration.  When delivering solutions, you should not allow the solution to drain below the bottom of the calibration range.  It is best to design your titration so that no more than 45 mL is needed but if it does look like you will run past the bottom, close the stopcock and record the reading.  Refill the buret, get an initial zero reading, and continue delivering the solution.  The total volume delivered will be the volume delivered before refilling plus the volume delivered after refilling.

Here is a video about the proper use of burets:

Analytical Balance

Weighing a sample on a modern analytical balance is one of the most common measurements in a chemistry laboratory.  Almost all of the analytical balances are electronic where the gravitational force of the sample is balanced by a magnetic force generated by an electromagnet. The current needed to maintain the position of the weighing pan is converted to a digital readout. This readout is calibrated against the current needed to balance an internal stainless steel weight. Modern balances can be accurate and reliable but are still susceptible to calibration and operation errors that affect the mass of the sample.

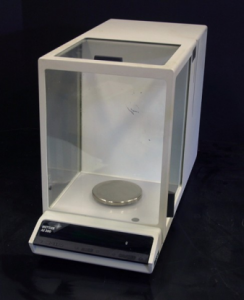
The Mettler AE200 balance that we use in the laboratory has a precision of 0.1 mg and a maximum capacity of 205 grams.  Don’t tare or try to weigh things above 205 grams.  The following points will help you obtain reliable weighing results.

Draft shields: The draft shields must be closed when weighing to avoid air turbulence and temperature changes.

Weighing pan: Place the sample in the middle of the weighing pan to avoid corner load errors.

Analytical balance

Mettler AE200

Maintenance: Probably the most common weighing error is a dirty balance or unclean weighing vessel.  Material, as small as a finger print, stuck to the weighing vessel or the balance pan will drastically affect the weight.  The balance must be kept clean.  If some material is spilled in the balance clean it immediately.

Use of the Mettler AE200:

  1. Have all glass doors closed.
  2. Press the single control bar to turn the instrument on.
  3. The instrument will zero itself after a few seconds.
  4. Add your weighing container (paper, boat). If you wish to tare (bring your scale back to zero after adding your weighing container), close glass doors, and press control bar briefly. There are times when you may not want to tare.  Record weight.  Add sample and record new weight.  The difference between these weights will be the sample weight.

Physical Influences

Unstable or wrong weighing values are often caused by physical influences such as:

  • Buoyancy
  • Temperature
  • moisture gain or loss by the weighing sample
  • electrostatically charged weighing sample or vessel
  • magnetic weighing samples or vessels

Temperature

A temperature difference between the weighing sample and its surroundings leads to air currents along the side of the weighing vessel that create dynamic buoyancy.  The net result is that hot objects appear lighter and cold objects appear heavier.  When possible, minimize the effects of temperature by letting the sample equilibrate to room temperature before weighing.

Electrostatics

A common sign of electrostatic effects is poor reproducibility.  A weighing vessel that shows different weights may have become electrostatically charged.  Materials that are good insulators like glass and plastic can become electrostatically charged when rubbed.  Latex gloves also hold onto electrostatic charge that can be transferred to a weighing vessel.  To avoid electrostatic effects do not rub weighing vessels with dry cloths/paper towels and, when possible, do not handle weighing vessels with latex gloves.

Here is a video about the proper use of a balance:

Lab safety

There are many hazards in the general chemistry lab that you need to be familiar with before you get started on your experiments. The hazards you will encounter during the semester include: chemicals, fire, pressurized gases, and sharp objects. Additionally, working in Bicentennial Hall in proximity with other laboratories requires a working knowledge of emergency procedures. Safety in the Laboratory at Middlebury College is overseen by the Environmental Health and Safety Working Group. Based on their recommendations, which can be accessed at their website, this webpage provides an overview of the most relevant information for the CHEM 103 laboratory. More specific information will be provided as needed during the semester.

Bicentennial Hall Safety

Fire alarms

In the event that a fire alarm is activated:

  • If possible, shut down and/or secure your experiment. This includes shutting off the gas, putting chemicals in the fume hoods, and closing the fume hoods;
  • If possible, collect essential belongings because you may not return to the classroom for several hours;
  • Evacuate the building via the nearest exit;
  • Check-in with your instructor outside of the building.
Telephones

Bicentennial Hall classrooms are equipped with telephones so we can call for help. Emergency phone numbers are listed next to the telephone.

Automated external defibrillator (AED)

In the event of a medical emergency, an AED is located in the Great Hall on the second floor of Bicentennial Hall. If an AED is needed, 911 should be called directly for immediate medical assistance.

Laboratory Housekeeping

Laboratory instructors and students are directly responsible for the cleanliness of their workspaces, and jointly responsible for common areas of the laboratory.

  • Access to walkways, exits, fire extinguishers, eyewashes, emergency showers, electrical disconnect panels, first-aid kits, and any other emergency equipment must remain unobstructed at all times. Access paths must not be used for storage of any kind, not even for carts or other portable items;
  • Keep floors clean and dry;
  • All incidental spills on laboratory benches or floors shall be immediately cleaned and appropriately disposed of;
  • Each laboratory worker shall keep their work area clean and uncluttered, with laboratory benches kept clear of unnecessary equipment and chemicals;
  • At the completion of each experiment or operation, the work area shall be thoroughly cleaned, with all equipment properly cleaned and stored, and chemicals returned to their assigned storage areas.

Chemical Safety

The Middlebury Chemical Hygiene Plan is available here. This content is based on the chemical hygiene plan.

Protective Equipment

Clothing and Hair: Clothing worn while working in the laboratory should offer protection from chemical splashes and spills, and should be easily removable in case of an accident. It is recommended that laboratory workers wear pants or clothing that covers the legs; shorts and short skirts are discouraged. Loose or flowing clothing and clothing made of flammable polymeric fabrics should be avoided. Clothing that completely covers the hands, arms and legs should be worn when working with any hazardous material that may cause skin irritation, burns, allergic reactions or has the ability to penetrate skin. Long hair should be secured while working to avoid unintended contact with chemicals or unguarded equipment.

Footwear: Footwear is required in laboratories at all times. The use of closed-toe, closed-heel, solid top shoes is strongly encouraged. Some laboratories may require closed-toe footwear in order to enter. High-heeled shoes, and shoes made of woven or porous material are not recommended while working in the laboratory, particularly if working with hazardous material that may cause skin irritation, burns, allergic reactions, or has the ability to penetrate the skin. Sandals, flip-flops and bare feet are expressly forbidden.

Eye and Face Protection: Eye and face protection is required anytime there is potential exposure to liquid chemicals, acids and caustic liquids, hazardous chemical gases or vapors, or potentially hazardous light radiation, such as UV radiation. Eye and face protection for a particular laboratory process should be selected based on the potential for exposure or damage to the eyes and face. Appropriate eye protection is required for all employees, students, and visitors to the laboratory, and shall be worn at all times when there is potential exposure to hazards. Chemical splash goggles are required to be worn by all laboratory workers in any laboratory where transfer and handling operations occur that involve use of the following materials: liquids capable of causing injury or disease if sprayed or splashed in the eye or highly-toxic chemicals. In laboratories where there is no possibility of injury due to spray or splash of hazardous liquids, safety glasses may be worn instead of splash goggles.

Hand Protection: Appropriate gloves shall be worn whenever there is a possibility of skin contact with chemicals or exposure to other hazards. Laboratory Supervisors will ensure that the selected glove material and type of construction is suitable for the substance being handled and the procedure to be used. Potentially-contaminated gloves must be removed before handling or contacting any objects in the laboratory that should not be contaminated, such as doors, telephones, pens, and computer keyboards. All gloves must be removed before leaving the laboratory and entering public areas and hallways. Disposable gloves (nitrile and latex) should never be reused.

Laboratory Coats: Laboratory coats are recommended, and may be required, when working in the laboratory, depending on the intended procedures. Laboratory coats should be buttoned at all times and removed immediately if they become contaminated. Laboratory coats and laundry services are available at no cost from Laboratory Stores.

Chemical Equipment and Glassware

The following procedures shall apply to the use of laboratory equipment and glassware:

  • All laboratory equipment is to be used only for its intended purpose;
  • Broken, cracked, or chipped glassware shall be immediately disposed in a labeled broken glass receptacle;
  • All evacuated glass apparatus such as vacuum manifolds should be used in a hood, or otherwise protected or shielded to contain chemicals and glass fragments in the event of an implosion;
  • Laboratory equipment should be inspected periodically and repaired or replaced as necessary.

Chemical and Waste Labeling

All chemical containers in the laboratory must be properly labeled. Dispensing of chemicals into secondary containers requires that the secondary containers be labeled with the full name of the chemical. An exemption from labeling requirements is made for transferring a chemical from a labeled container into another container, such as a beaker or Erlenmeyer flask, where the chemical is solely for the immediate use of the worker who performed the transfer and the container is in the control of the user at all times.

Chemical Disposal

Generally, materials suitable for drain disposal in limited quantities must meet the following physical and chemical criteria:

  • They are liquid and readily water soluble (soluble at 3% concentration);
  • Easily biodegradable;
  • Simple salt solutions of low toxicity inorganic substances;
  • Dilute organic substances of low aquatic toxicity and concentration of 5% or less.

The following materials should never be poured down drains or placed in regular trash as a method of disposal:

  • Oil, grease, petroleum or other water insoluble chemicals;
  • Compounds that could result in the presence of toxic gases or vapors;
  • Water reactive materials;
  • Water soluble polymers that could form gels in the sewer system;
  • Malodorous compounds or volatile organic chemicals that can cause exposures or obnoxious odors;
  • Any waste that could impart color that cannot be removed by the Town of Middlebury Wastewater Treatment Facility (i.e. dye wastes and stains);
  • Toxic chemicals such as carcinogens, mutagens, teratogens;
  • Flammable materials (flashpoints less than 140°F) unless sufficiently diluted in water as part of the laboratory process such that the solution has a residual flashpoint greater than 140°F;
  • Heavy metal compounds;
  • Phosphoric acid or phosphates.

Chemical Spill Response

Incidental Spills: Incidental spills are small spills that do not pose a significant safety or health hazard to lab workers in the immediate vicinity or to the worker cleaning it up. Incidental spills do not require an emergency response and may be cleaned up by employees working in the area if it can be done safely and easily and spill response materials are available. Any incidental spill shall be immediately cleaned up and cleanup materials properly disposed. Appropriate personal protective equipment (PPE) must be worn while cleaning up incidental spills.

Personnel shall immediately contact the Chemical Hygiene Officer, Laboratory Stores and Safety Manager, or the Director of Sciences Support Services for a spill that meets one or more of the following criteria:

1. The volume is large, cannot be contained, or exceeds the capacity of cleanup materials available in the laboratory;

2. May result in chemical exposure or injury;

3. Presents an immediate hazard (fire, explosion, chemical exposure, etc.);

4. Involves a highly dangerous chemical, including acutely hazardous or toxic materials; or

5. Is a spill of an unknown material.

Safety and Emergency Equipment

Safety and Emergency Equipment Safety and emergency equipment is provided in or near all laboratories. Pathways to and access to this equipment must never be blocked or obstructed. Laboratory personnel should familiarize themselves with the location and proper use of safety and emergency equipment, including fire extinguishers, gas shutoff valves, emergency showers, and eyewash stations. Specific training in the use of fire extinguishers is available through the College’s Environmental Health and Safety Office.

Eyewash Stations: Emergency eyewash stations are provided in or near all laboratories where hazardous materials may be used.

Safety Showers: Emergency showers are provided in or near all laboratories.

Fire Extinguishers: Fire extinguishers are located in or near all laboratories. Fire extinguishers in laboratories are generally BC type, which are suitable for fires caused by flammable liquid fires such as grease or gasoline, and electrical fires. These extinguishers are not appropriate for fires involving metals such as magnesium, sodium or potassium.

Chemical Spill Response Kits: Chemical spill response kits and sorbent materials are available in the laboratory.

First Aid Kits: Laboratories are equipped with a basic first aid kit containing bandages and disinfectant wipes to treat minor cuts, scrapes, abrasions and burns.

Fume Hoods: Use of a laboratory fume hood is recommended for any work with volatile chemicals. A fume hood is to be utilized for all chemical procedures which might result in release of hazardous chemical vapors, mists, or dusts.

  • In the event of a spill, smoke, or other unintended vapors, press the emergency purge button to increase to maximum fan speed;
  • Keep the sash of the hood lowered at all times except when making adjustments to apparatus within the hood. This is to prevent vapors from spilling out of the hood, and also to provide containment in the event of a vigorous or runaway reaction;
  • KEEP FACE AND HEAD OUTSIDE OF THE FUME HOODS when chemicals are in use or chemical processes are occurring;
  • Items inside the hood should always be kept to a minimum, and should be limited to the chemicals, apparatus, or other items being used in the immediate procedure. Working hoods should not be used as a storage area for chemicals or waste unless designated for that purpose;
  • Minimize interference with the inward flow of air into the hood by keeping apparatus and reagent bottles at least 6 inches (15 cm) back from the hood face, and ensuring that the exhaust slots at the rear of the hood are not blocked.

Safety Data Sheets: Safety Data Sheets (SDS) provide standardized information for chemicals. SDS include chemical names, hazardous ingredients, physical and chemical characteristics, fire and explosion hazard data, reactivity data, health hazard data, precautions for safe handling and use; and control measures. A copy of any required SDS shall be readily accessible in the laboratory where the chemical is used. SDS sheets shall be available 24 hours a day, in case of an emergency. Middlebury College will retain a copy of each Safety Data Sheet (SDS) for laboratory chemicals sent by the manufacturer, and will make a reasonable effort to obtain an appropriate SDS for all other commercial laboratory chemicals. SDSs for substances used in Bicentennial Hall laboratories will be maintained in a central file in the Laboratory Stores or electronically