Written by S. Sontum, D. Copeland, and K. Jewett. Edited by R. Sandwick, M. J. Simpson, and R. Bunt
Learning Goals
- Demonstrate safe handling of hazardous chemicals;
- Practice writing a hypothesis based on Atomic theory, and write a conclusion based on the hypothesis;
- Practice using a thistle tube;
- Generate hydrogen gas and then use it as a reducing agent;
- Perform chemical degradation analysis, then use the results to calculate an empirical formula;
- Observe elements that have different states of matter: solid copper, liquid bromine, and gaseous hydrogen;
- Write a balanced equation to describe a chemical reaction, and draw Lewis structures for reagents involved in the reaction.
Introduction
In the summer of 1803 John Dalton was working on the relative weights of elements that combine in chemical reactions. He summarized the results of these experiments in his law of multiple proportions: When two or more elements unite to form more than one compound, the masses of one element that combine with a given mass of another are in ratios of small integers.
For example consider the oxides of nitrogen with the formulas N2O (nitrous oxide or laughing gas), NO (nitric oxide) and NO2 (nitrogen dioxide). Because these compounds contain the same element in different proportions they may be used to illustrate the law of multiple proportions. If we use 14 g of nitrogen to make each of these oxides, the mass of oxygen combining with this mass of nitrogen are 8 g in N2O, 16 g in NO, and 32 g in NO2. These numbers 8: 16: 32 are simple fractions of each other, as required by the law.
To explain these experiments Dalton drew up the tenets of his atomic theory. Is the concept of the atom just a theoretical construct? The atom was not an abstraction to him or to the modern day chemist. Each indivisible atom has a unique physical weight. The multiple proportion ratios are simply a reflection of the mole ratios or atom ratios given by the molecular formula. There has been debate among historians as to the order of Dalton’s two great generalizations. Which came first, the atomic theory or the law of multiple proportions? Most probably in Dalton’s mind the two ideas were essentially one, just as these two ideas are now combined in the modern day concept of a molecular formula.

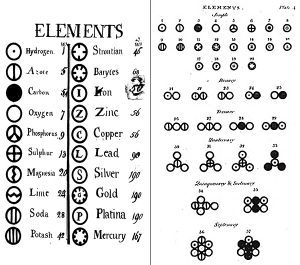
Dalton’s elements http://thehistoryoftheatom.weebly.com/john-dalton.html
Background
In this experiment you will determine the molecular formula of a metal bromide by first decomposing it with heat, then converting it to a metal oxide by oxidation, and finally reducing it to a pure metal. Similar steps are used by the mining industry to refine metals. Metals are often found in nature as metal oxide ores. Metal oxides are examples of inorganic salts [Mn+ O2-] where the metal is found as a positive ion ionically bonded to oxygen dianions (oxides). Formerly, the term oxidation meant “reaction with oxygen” and the term reduction meant “to refine a metal.” Oxidation is now more generally defined as the loss of electrons and reduction is defined as the gain of electrons. Using this definition M2+ is an example of a oxidized metal because it has lost electrons (two) relative to its neutral or elemental form of the metal. A few metal oxides, such as those of silver and mercury, can be decomposed to free metal by heat alone. All others must react with reducing agents. Reduction results in the removal of oxygen as the positive metal is converted to its neutral or metallic form by gaining electrons. In the preparation of metals from their oxide ores, carbon in the form of coke is often used to reduce the metal because it is relatively inexpensive. In the laboratory, hydrogen gas is a very convenient reducing agent. At high temperature hydrogen will reduce many metal oxides including copper oxides.
Hydrogen can easily be generated by the oxidation/reduction reaction between zinc metal and sulfuric acid:
Zn(s) + H2SO4(aq) —> ZnSO4(aq) + H2(g)
You will be given a compound (compound I) that contains only copper and bromine. When heated, compound 1 loses part of its bromine to form a different compound (compound II), liberating bromine gas in the process:
2 CuBrx(s) → 2 CuBry(s) + (x-y) Br2(g)
On subsequent treatment with nitric acid all of the residual bromine is removed in a series of oxidation reactions and only an oxide of copper remains. This series of reactions can be summarized as:
2 CuBry(s) + z O2(g) → 2 CuOz(s) + y Br2(g)
Finally we can determine the mass of copper by reducing the copper oxide to pure metallic copper with hydrogen gas:
CuOz(s) + z H2(g) → Cu(s) + z H2O(g)
From the mass losses accompanying the stepwise removal of bromine, we can calculate how much bromine there was in compound I and compound II. The relationship between these masses and the mass of copper in the sample will allow us to demonstrate the law of multiple proportions.
Procedure
Note: Perform this lab with a partner.
Part I: Transformation of Compound I to Compound II
- Determine precisely on an analytical balance the mass of your large Pyrex test tube. Then add about a gram of compound I, and reweigh the tube and contents. Note the color of compound I. Record this data in Table 1.
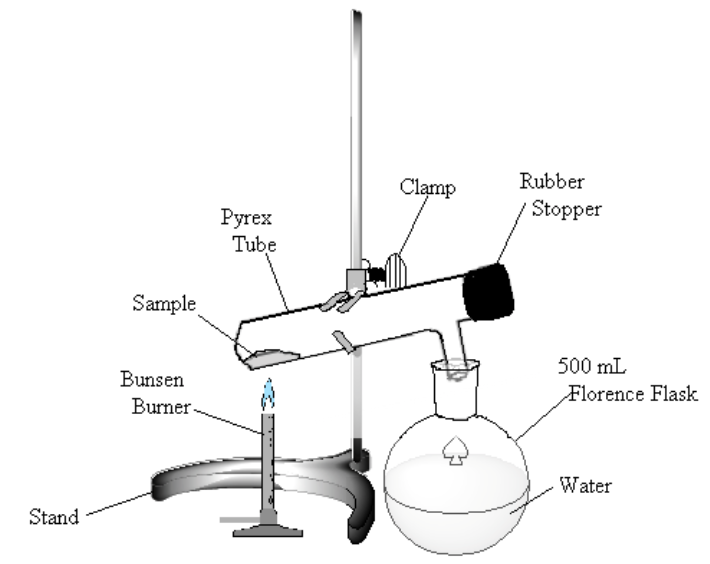
- In the hood, assemble the apparatus shown in Figure 1. The test tube is slightly inclined to keep the sample away from the rubber stopper. The Florence flask is filled about half full of water and serves to trap the noxious bromine vapor that will be formed. Tap a spatula tip full of sodium thiosulfate to the water. Have your laboratory instructor or TA check the apparatus before proceeding. Note: Bromine is a poisonous oxidizing agent. Avoid inhaling the vapor. Keep the liquid off your skin. Any spillage should be treated immediately with sodium thiosulfate and lots of water.
-

Figure 1
Heat the sample gently. If bromine (a dark-red liquid) condenses at the upper end of the test tube, warm it gently to vaporize the liquid. Continue to heat the sample until no more bromine vapor is evolved (bromine vapor is yellow), perhaps 10 minutes.
- Allow the test tube to cool. Remove the stopper, and “pour” any residual bromine gas into the Florence flask. Clean out any rubber stopper residue.
- Remove the test tube from the hood. If you notice a strong smell similar to chlorine, immediately put the test tube back into the hood and attempt to pour out more residual bromine.
- Weigh the tube and contents precisely and note the color of compound II. Record this data in Table 1.
Part II: Transformation of Compound II to Copper Oxide
- Working in the hood, pour about 1.5 mL of concentrated nitric acid into the test tube containing compound II. Note: Nitric acid is extremely corrosive to the skin. Flush immediately with large amounts of water in case of contact with your skin.
- Reassemble the apparatus of Figure 1.
- Heat gently to avoid spattering until the dry blue-green copper nitrate is formed and then heat strongly to form the black copper oxide. Wave the flame up and down the tube until the yellow vapor disappears. If the copper oxide is not completely dry, heat until it appears dry. You can’t overdo this step, so really let it burn a long time, perhaps 15 minutes. Let it cool, then clean out any rubber stopper residue.
- Remove the test tube from the hood. If you notice a strong smell similar to chlorine, immediately put the test tube back into the hood and attempt to pour out more residual bromine.
- Weigh the black copper oxide and test tube. Record this data in Table 1.
- Clean up: the bromine and sodium thiosulfate solution can go down the drain. Keep your copper oxide.
Part III: Reduction of Copper Oxide to metallic Copper
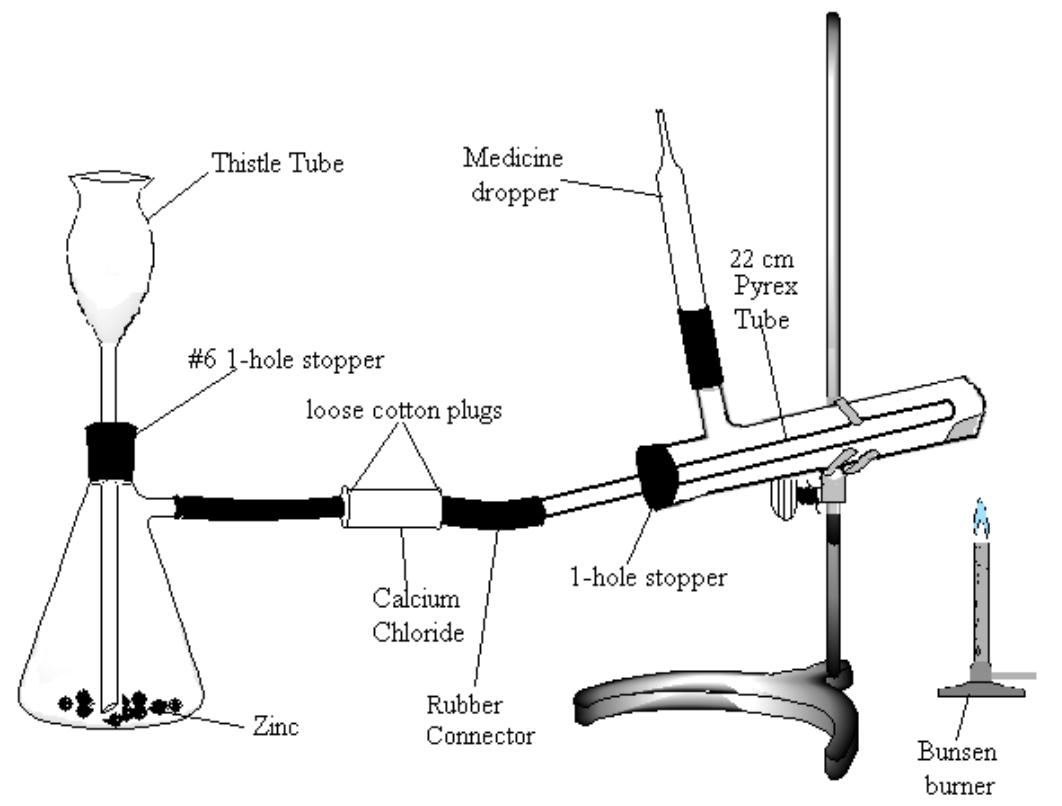
Assemble the apparatus shown in Figure 2. Note: be very careful to use the following method for introducing glass connections into rubber stoppers or rubber connectors (very severe cuts can result if the glass tubing breaks and the jagged ends get pushed into the hands): moisten the stopper and tube with a small amount of water or glycerol for lubrication. Grasp stopper and tube close together with a cloth, and insert the tube into the stopper with a twisting motion, being careful and applying pressure gently.
- Place about 20 g of a combination of granulated and pieces of zinc in the Erlenmeyer flask. Be sure to have the bottom of the thistle tube extending to the bottom of the flask (check that the tube is not blocked by the zinc).
- Fill the calcium chloride tube two-thirds full of anhydrous calcium chloride.
- Being careful that all of the copper oxide stays toward the closed end of the test tube, attach the tube to your apparatus. Tilt the test tube slightly upward at the closed end. The gas jet is a short piece of red tubing connecting the side-arm on your test tube and the glass portion of a medicine dropper.
- Make a Pyrex tube approximately 20 cm long fire-polished at both ends to place in the test tube.
- Make sure that all connections are tight. Leave enough space between the ends of the glass tubes in the rubber connector so that the connector can be pinched shut.

Figure 2
- Introduce 1.0 mL of a dilute solution (0.2 M) of copper sulfate and then 10 mL of water into the generator through the thistle tube.
- Add 30 mL of dilute (6 M) sulfuric acid. Make sure the bottom of the thistle tube is below the surface of the liquid. Add more acid if it is too shallow.
- Bubbles of hydrogen will form and sweep through the apparatus, flushing out the air. A mixture of hydrogen and air is very explosive, and if the gas escaping from the delivery tube is lighted before all of the air has been driven out of the generator, a violent explosion will result. To avoid this danger, the gas issuing from the delivery tube of a hydrogen generator should always be lighted in the following manner: Invert a test tube over the jet and allow it to fill with gas. Close the end of the test tube with the thumb and, bringing the inverted test tube near a Bunsen flame which is at least 2 ft from the generator, remove the thumb and light the gas. Then, holding the tube still in the inverted position, immediately attempt to light the gas coming from the delivery tube with the nearly invisible flame issuing from the test tube. If the gas in the generator is explosive, it will explode in the test tube and leave no flame. When, however, the flame in the tube lasts long enough to enable one to light the gas issuing from the jet, it is evident that the gas in the generator is no longer explosive.
- After the hydrogen at the jet has been lighted, hold the burner in the hand and gently heat the end of the test tube containing the oxide. Gradually raise the temperature to red heat. (However be careful that you do not melt your test tube!) It is safe to proceed with the experiment even if the hydrogen flame goes out, provided a brisk and steady evolution of hydrogen is maintained. It may be necessary to add more sulfuric acid to the bottle. If the level of the acid is below the bottom of the thistle tube, pinch the rubber tubing to raise the level of the acid, thus preventing air from being trapped in the thistle tube. Why is this dangerous?
- Continue the heating until all of the oxide has been converted to metal. (Caution! The tube gets very hot.) This will require about 10 – 15 minutes. What is the product which collects in the cooler portion of the test tube?
- Allow the tube to cool in the current of hydrogen, pinch the rubber connector for a moment to put out the hydrogen flame, and disconnect the apparatus. Wipe out any water or rubber stopper residue you find at the mouth of the test tube with a paper towel, and weigh the tube. Record the data in Table 1.
- Clean up: copper dust goes in the trash can. Decant the water off of the leftover zinc. Pour this water down the drain. Put wet zinc in the collection beaker for reuse.
Report
Fill out this worksheet. Turn in either a paper or digital copy.
