Making an HTML template to automate newsletters

In this post I will be attempting to create an HTML e-mail template that can be populated with user generated content from nodes on a Drupal website.

Objective: Create an HTML e-mail template that LIS can create into a dynamically generated e-mail.

Requirement: The HTML must have a consistent presentation on all our supported e-mail clients. The template must be flexible in the amount of content links. The template allows for customization of the right-hand column links and content. The Banner image and colour theme will be customizable.

Deliverable: I will send LIS HTML that will have explicit commenting and bullet-proof structure.

Harris Online HTML e-Mail templates

I’m making HTML emails for College Advancement. The project will result in 4 e-mails with the same design. My plan is to make 1 template and flow the text.

First I look at the 4 designs and imaging the grid that will work for all versions

Four e-Mails. One Template.

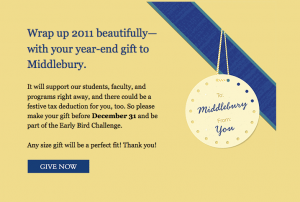
Email clients rely on tables and ignore much of the CSS I use in Web development to style and layout my HTML. I know that many web-mail clients(gmail, outlook, hotmail etc.) will ignore or outright strip background images from e-mails. In some e-mails I create, I can use background images with out loosing the message. In this, however,  case I know I will need the recipient to see the image. This means I will have to cut the image of the ribbon to create the box for the HTML text. It is never, ever a consideration to send the main part of the message in an image. Never do this. Never.

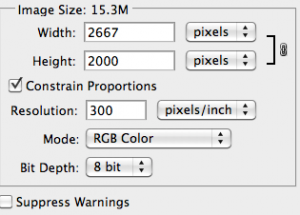
In the dialog-box for photo shop I open the image at an higher resolution than will be eventually presented

bicubic resampling results in sharper images

I will open one of the PDF’s in PhotoShop. I open the pdf at a resolution higher than the final size i will need. I found that when I use Pshop to reduce the image to the final dimension and resolution I get a sharper image using the ‘image-size’ dialog and the Bicubic Sharper drop-down, than if I bring the image in at the final dimension. ***It probably should be noted that the designer creates the e-mails in Indesign so the artwork is generally at a higher resolution that necessary for the web.***

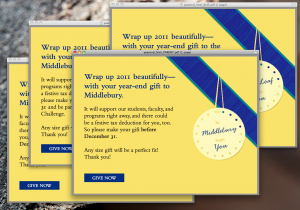
I slice the image up to fit my plan. I am going to break the ribbon image so I make a nice neat box for the HTML. The fist image will be the little triangle tail that forms the top of the table. The main part of the ribbon will span 2 rows and start at the top.

After I have my images I open my favorite text editor and copy the HTML header information I have from Previous e-mails:

<!DOCTYPE HTML PUBLIC “-//W3C//DTD HTML 4.01 Transitional//EN”
“http://www.w3.org/TR/html4/loose.dtd”>
<html lang=”en” style=”height: 100%”>
<head>
<meta http-equiv=”content-type” content=”text/html; charset=utf-8″>
<title>Middlebury</title>
</head>
<body style=”margin: 0; height: 100%;”>
<table border=”0″ cellpadding=”0″ cellspacing=”0″ width=”100%” style=”height: 100%; background: #003366;”>
<tr>
<td align=”center” valign=”top”><div style=”text-align:center;”>
<table border=”0″ cellpadding=”0″ cellspacing=”0″ style=”background: #ffffff; width: 620px; font: 13px Georgia, serif; line-height: 1.8em; color: #043178;margin-top: 4px;margin-right: auto;margin-bottom: 12px;margin-left: auto;”>
<tr>
<td style=”text-align: right;”>
</td>
<td>
</td>
</tr>
<tr>
<td valign=”top” align=”center”>
<a href=”http://go.middlebury.edu/give” target=”_blank” style=”color: #003366; font-size: 13px; font-weight: bold; text-decoration: none; margin-top: 24px; margin-bottom: 32px; display: block;”><img src=”images/btn_givenow.gif” alt=”GIVE NOW” title=”GIVE NOW” border=”0″ width=”155px” height=”44px” /></a>
</td>
</tr>
</table>
</td>
</tr>
</table>
</body>
</html>

Now I will put the HTML together.
Some tricks worth noting are:

  • Use in-line styles. Classes in the header are ignored in most web clients
  • You can style alt-tags for an image. Outlook’s web-client strips the Alt tag for some reason, but most email clients render the text in a styled way that can improve the look of your email when images are blocked. It’s also no sweat. Just wrap your image element in a <span> with style=”font-size: 24px;” ect.
  • Don’t use concatenated styles. For example <span style=”font: 14px #330066 Georgia, serif;”> should be <span style=”font-size: 14px; color: #330066; font-family: Georgia;”> and <img src=”” style=”margin: 24px 0 12px 0;” /> should be <img src=”” style=”margin-top: 24px; margin-right: 0; margin-bottom: 24px; margin-left: 0;” />
  • Images that must me immediately abutted  need a display:block; style
  • Special Characters need to be encoded for HTML. The most used non-ascii characters are em-dash=— apostrophe=’ and smart quotes=“ and ” <–wordpress rendered those I will place a link to the code items
  • some email clients don’t recognize paragraph tags(I’m looking at you outlook) so I use breaks <br /> <br /> instead.

Looking pretty good now-

Web Version

It’s good to note for your design and approval team that HTML needs to be flexible and will therefor not look exactly like the Indesign file. One— not all (statistically none) of your recipients will have  Bembo installed and Two— you wont be able to control line breaks with the precision of a flat graphic file.


Now Over to Harris:

First I copied the subscription information that is necessary for the footer over to my HTML. Then I copy the HTML between the Body Open and Close tags and paste that into my new mailing using the source editor view

Sauce Button

I add the images to my file manager. and replace my broken links to the graphics in the HTML with the new URLs. in hindsight I probably could have used the magic import HTML button. I wonder if that will suck in the images? PS. No it doesn’t. I could host the images on our web server, but I think this is the better way for performance and security.

Now I’ll fire off some tests to the design team and copy proofer.


My HTML as it stands looks like this:

<table width=”100%” cellspacing=”0″ cellpadding=”0″ border=”0″ style=”height: 100%; background: #f5df7e;”>
<tbody>
<tr>
<td valign=”top” align=”center”>
<div style=”text-align:center;”>
<table cellspacing=”0″ cellpadding=”0″ border=”0″ style=”width: 620px; font: 13px Georgia, serif; line-height: 1.8em; color: #043178;margin-top: 4px;margin-right: auto;margin-bottom: 12px;margin-left: auto;”>
<tbody>
<tr>
<td valign=”top” style=”text-align: right;”><img src=”http://alumniconnections.com/olc/filelib/MDR/email/Library/Year-End/Ribbon_1.gif” alt=”” /></td>
<td valign=”top” rowspan=”2″ style=”text-align: left;”><span style=””><img vspace=”0″ hspace=”0″ style=”display: block; border: 0; margin:0″ alt=”To: Middlebury, From: You” src=”http://alumniconnections.com/olc/filelib/MDR/email/Library/Year-End/Ribbon_2.gif” /></span></td>
</tr>
<tr>
<td valign=”top” align=”left”>
<p style=”margin: 0; padding-top: 0; padding-right: 0; padding-bottom: 12px; padding-left: 25px; font-size: 16px; font-family: Georgia, serif; line-height: 1.45em; text-align: left; color:#000000;”><span style=”font-size: 26px; font-family: Georgia, serif; line-height: 1.45em; text-align: left; color:#043178;”>Wrap up 2011 beautifully&mdash;<br />
with your year-end gift to Middlebury.</span> <br />
<br />
It will support our students, faculty, and programs right away, and there could be a festive tax deduction for you, too. So please make your gift before <strong>December 31</strong> and be part of the Early Bird Challenge. <br />
<br />
Any size gift will be a perfect fit! Thank you! <br />
<br />
<a style=”color: #003366; font-size: 13px; font-weight: bold; text-decoration: none; margin-top: 0; margin-bottom: 32px; display: block;” target=”_blank” href=”http://go.middlebury.edu/givEarly”><img width=”150px” height=”34px” border=”0″ title=”GIVE NOW” alt=”GIVE NOW” src=”http://alumniconnections.com/olc/filelib/MDR/email/Library/Year-End/btn_givenow.gif” /></a></p>
</td>
</tr>
</tbody>
</table>
</div>
<table width=”620″>
<tbody>
<tr>
<td align=”left” style=”font-size: 10px; color: #333333;” width=”320″>
<p>This message is being sent to you because of your affiliation with the ${.vars[&quot;generaltags__ma_orgname&quot;]} On-Line Community at URL <a href=”${.vars[&quot;generaltags__ma_orgurl&quot;]}”>${.vars[&quot;generaltags__ma_orgurl&quot;]}</a>
<br />
<br />
<em>Removal Instructions:</em><br />
To remove yourself from future mailings <a href=”${.vars[&quot;linktags__unsubscribe_link_html&quot;]}”>click here</a>.<br />
<br />
${.vars[&quot;generaltags__open_count&quot;]}
<p>&nbsp;</p>
</td>
<td>&nbsp;</td>
</tr>
</tbody>
</table>
</td>
</tr>
</tbody>
</table>

Social Scene

The following video is an argument for embracing social media early and to start getting up to speed now. The video has excited me about using social media by giving me a better picture of how the number of ‘likes’ or ‘friends’ will be used in communicating the college’s message. I have a new understanding of how the statistics of ‘likes,’ ‘followers,’ and ‘friends’ directly work with the college’s goals.

http://www.youtube.com/watch?v=nAdBAzaXVf4

Content Audit: Who’s Talking

MiddBlog’s Audrey Tolbert (she, at least is admin, for http://go.middlebury.edu/twitter) has a self-maintained google form that creates a spreadsheet of various twitter accounts and their owners.

https://spreadsheets.google.com/pub?key=rEbnQbr0RamvJkXSunGuu8Q

search.twitter.com
They have improved the search tool on the site and it returns some nice results.

Facebook insights
Insights gives us a demographic breakdown for the people who are active on our page. The could be useful for CA to plan events in cities where there is an active community.

Google Alerts

Icerocket
See conversations and mentions of keywords. The display is in a tabbed fashion and shows foursquare, Linked-In, Facebook, and Twitter.

These sites display the influence you have in social marketing.
Kred
peoplebrowsr.com
Klout

Set-up listening stations

  • Admissions
  • Arts
  • Athletics
  • College Advancement
  • Communications
  • Crisis Management (PR?)

Construct Ambassador Program

Admissions uses similar group for walking tours
Ambassador Examples Blogs and Students
Saint Michael’s College
College of William & Mary
SUNY Oswego
Glendon campus of York University
Rochester Institute of Technology

Managing an Ambassador program:lessons Learned
http://roc.highedweb.org/schedule/media-four/

Create a Contract of expectations, responsibilities and rewards.
Have team maintain a formspring account or Blog for a month to try them out

http://twitter.com/pheak (brand believer)

Control the megaphone

Add hash-tags to events to help users find each-other. #middcommencement could be used for Flickr streams as well as Tweets. Setting up hash-tags establishes an intersection for the content creators and the audience. The vehicle for the media eases dialog and sharing with little effort on our part.

MiddStart is a good example of us providing a space for connections. This can be improved by opening up the conversation on Facebook, YouTube and Flickr. Start a MiddStart Account and create pages for each of the Projects. Archive closed projects. Use middStart.midd to aggregate the content

Tools for Monitoring

Monitor Conversations with HootSuite. It allows one to view live updates of multiple profiles and social media channels, including Facebook, Linked-In, Twitter, Four Square, and blogs.

HootSuite Pro allows multiple administrators to maintain accounts and make assignments for responses or flag content for sharing or deletion.

Need to respond? Here is a response flowchart  from Depaul University:
EMM_Post_Response_Flowchart

Things we can do to improve our use of the Social Graph

We have done a good job at embracing link sharing, but we are not doing a good enough job at sharing the conversation.

Class List for @middlebury FB only goes to 2010

Establish a class of 2015?

Set-up hash-tags for topics/events/programs that have gravity. The power of social graphs are that we only need one highly connected active member to make a shared event successful.

Make a wordpress plug-in for middmag to enable other Bloggers embed our content and reach a broader audience

Publish hashtags that will unify Flickr, ustream, facebook, youTube and Twitter posts for events. This will allow those who are geographically challenged to attend.

We could stream a live video of the next commencement, allow attendees to upload images to flickr, and accept live tweets and Facebook posts. This crowd sourced content will be available after the event to be searched or shared.

To test the water of this sort of live event broadcast, we could use a popular small venue event—perhaps an Art event. Promote a Hash-tag for sharing media and tweets. As an alternative to streaming video the event could stream audio and use crowd sourced snapshots from cellphones or a professional photographer using a wireless data-card like an Eye-fi. The images will be uploaded to a Flickr Account sporting the promoted tags. A webpage could aggregate the content and present live tweets that use the same tag.

We should set up a place where those who blog, tweet, or facebook about Middlebury can be cataloged. That information should be made publicly available as MiddBlog had done.

Our Facebook page can use some further customization. Amherst uses their page to present their YouTube Videos and Flickr Stream.

Google+. Slow-starter but one to be aware of

Google+ in the classroom. An article showing the possible future use of google+ in our classrooms. Innovative Social Media Use at Colleges: Will Education Pioneer Google+?

Google+ added places and will compete more fully with Facebook.

Making a countdown digital display in PHP

The project came up to email some sort of countdown clock by email through lyris to potential donors. The challenge is to produce in the email box of the prospect an accurate representation of how much time is left to help Middlebury acheive 60% participation that results in Middlebury College receiving a $1mm additional donation.

Countdown timers are very effective in instilling a sense of urgency in a challenge. The problem is email clients can not perform any scripts or complex animations other than GIFs. So the solution is to pull a series of images that reflect the current difference in time from when the images are pulled and the deadline. Adding an animated gif will help the illustration.

With this solution in mind I remember being able to produce a graphic from data in a MySQL table. This was done this way:

CODE*

//—

<?
require(‘dbconnect.php3’);

$uniqid = $_GET[‘u’];
$SQL = “SELECT bin_datab,filetypesb from prod WHERE uniqid = $uniqid”;
$result = mysql_db_query($db, $SQL, $connection) or die(mysql_error());

$data = mysql_result($result,0,”bin_datab”);
$type = mysql_result($result,0,”filetypesb”);

Header (“Content-type: $type”);//headertype very important
echo $data;
?>

–//

This PHP file is called from another page with <img src=”image.php?u=92938″>

I also know how to display time in php
<?php
$today = date(d);
print “today is “.$time;
?>

I know how to set a day in the future:
<?php
$target = mktime(12, 0, 0, 7, 01, 2009);
?>

I know how to make a time differential:
$target = mktime(12, 0, 0, 7, 01, 2009);//what time to which to countdown
$today = time ();
$difference =($target-$today);//howmuch time is left

So, I’m almost there.
I need to have a series of images 0-9 that will help represent the time left in my digital clock.
Created in illustrator

Now I need to grab the time difference and pull out the days, hours, minutes, seconds numerically then separate the 10’s and 1’s columns of the return. I also don’t want to make more than 10 graphics or more than one image.php.

I know I can pass variables to image.php by adding ?variablename=definition to the url and use $_GET[] to pull it into the php page. so I define the unit of I want to return by sending ?t=d (for day in numbers). This will return. 01-12 That’s good but I would have to make 12 graphics to represent this ( and 48 more to represent the minutes).

I need to grab a column(10’s or 1’s) in the returned number. PHP can handle this but I need to tell the parsing program what column I want returned: image.php?t=d0 and image.php?t=d1.

My client-side page looks like this:

<!DOCTYPE html PUBLIC “-//W3C//DTD XHTML 1.0 Transitional//EN” “http://www.w3.org/TR/xhtml1/DTD/xhtml1-transitional.dtd”>
<html xmlns=”http://www.w3.org/1999/xhtml” style=”height:100%;”>
<head>
<title>Test Countdown</title>
</head>

<body style=”margin: 0; height:100%;”>
<div style=”margin: 0 auto; width: 790px”>

<table cellspacing=”0″ cellpadding=”0″ bgcolor=”#003366″ style=”font: 11px courier; font-style: italic; color:#ddd; border: 4px #003366 ridge; padding: 10px 10px 5px 10px;”>
<tr>
<td valign=”bottom”>
<img src=”image.php?t=d0″ width=”52″ height=”70″ />
<img src=”image.php?t=d1″ width=”52″ height=”70″ />
</td>
<td valign=”bottom”><img src=”images/col.gif” />
</td>
<td valign=”bottom”>
<img src=”image.php?t=H0″ width=”52″ height=”70″ />
<img src=”image.php?t=H1″ width=”52″ height=”70″ />
</td>
<td valign=”bottom”>
<img src=”images/col.gif” />
</td>
<td valign=”bottom”>
<img src=”image.php?t=i0″ width=”52″ height=”70″ />
<img src=”image.php?t=i1″ width=”52″ height=”70″ />
</td>
<td valign=”bottom”>
<img src=”images/col.gif” />
</td>
<td valign=”bottom”>
<img src=”image.php?t=s0″ width=”52″ height=”70″ />
<img src=”image.php?t=s1″ width=”52″ height=”70″ />
</td>
</tr>
<tr>
<td>Days</td>
<td></td>
<td>Hours</td>
<td></td>
<td>Minutes</td>
<td></td>
<td>Seconds</td>
</tr>
<table>
</div>
</body>
</html>

—-

My Parsing page looks like:

<?php
if (isset($_GET[‘t’]))
{
$timeDefinition = $_GET[‘t’]; //what time to display from the refering url d0, d1 …
$displayTime = $timeDefinition[0];//Grab the first character from the url
$column = $timeDefinition[1];//Grab the second character from the url
//time differential
$target = mktime(12, 0, 0, 7, 01, 2009);//what time to which to countdown
$today = time ();
$difference =($target-$today);//howmuch time is left

$ref = date($displayTime, $difference);
$image = $ref[$column];

header(“Location: images/$image.gif”);
}
else
{
header(“Location: images/0.gif”);
}
?>

Result days to my BDAY:

Months Days Hours Minutes Seconds
Depending how your browser cashes the images you may be able to reload the page and see the seconds go. I imagine this could be handled in the browser with Javascript or the like but remember this is being emailed out to prospects nothing but plain images would work. Comments welcome.

Let’s Make a Slide Show HTML Primer

Web Introduction to web production
Let’s make a slide show

I want to set up a time to do an introduction to web production. Most of us learn best went project based. I have a slide show that I have to make and I thought you could all come along for the ride.

This project will result in a click through of images. This introduction will cover Basic HTML code and grooming images for the web using photoshop.

Class materials
A computer
8+ photos or images
Access to Photoshop to resize the images
Illustrator but not necessary.
Notepad for PCs and SimpleTextTextWrangler for Macs (no WISYWIGs yet)
A web browser.

First things first:
Make a thumbnail sketch of the layout for your slideshow. Consistency in where your navigation buttons (in this case next and previous buttons) and display areas are located is critical in good site design.


I then like to use Illustrator to layout my grid it allows me to make numeric widths and heights in pixels so I can make sure I can fit the elements in comfortably. (whitespace is the mantra)
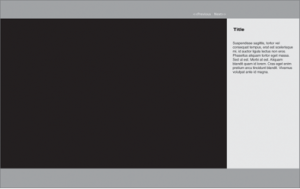
Using Illustrator also allows me to get an idea of the tonality for the UI (User Interface). The images will draw the viewers attention the copy has to be next and the navigation as to be third in most cases. Other tweaks can me made using color and stroke in the final tests.

I also now know the image display area needs to be 720px wide and I can now calculate the margin to the description text.

Photoshop.

Open each image and make it 720px wide it would be excellent for each image to be the same Height and Width. This sometimes won’t happen but if it is possible crop each image to 720x480px 72dpi(screen resolution).

Save the images using PShop’s export to web feature as a JPG with Medium compression. A folder labeled “images” in a folder label “slideshow.”

We are now ready to “Web it Up!”

Basic elements to HTML

All web site have these tags in common:


<html>
<head>
<title>
</title>
</head>
<body>

</body>
</html>


It’s important to understand that HTML “tags” have open tags <body> and close tags </body>

When you get to a web site by typing in its URL you are presented with webpage. The Web Server is configured to display a Home Page or landing page. The most widely used name of this Home Page is index. Some Windows servers use default. Some Servers are configured to recognize either.

The extension we will be using today is .html. You have probably seen extensions of .php, .asp, .aspx,, .htm. These just indicate that the page can use some web services provided by the server that allow server site scripting. We’ll cover that in the next tutorial.

Open TextEdit TextWrangler (PCs use NotePad)
Type this

<html>
<head>
<title> Middlebury SlideShow </title>

</head>
<body>
<h1 id="title">Title</h1>

</body>
</html>

Save the file as index.html in a folder you created called slideshow.

Go to the finder and drag that file into your web browser

Lets add an image:
Add
<img src="images/(THE NAME OF the FILE)" />
Under “Title”

Go to your web browser and refresh the page. you should see you image and text on the same line. if the browser window width is less than the image and the text the image will appear under “Title.”

To a very basic level this demonstrates the fundamental difficulty of formatting websites for the myriad of browsers and user settings. “well it looks correct on my machine,” is the mantra of a poor web programmer.

Formatting the document.
Add a line brake after by typing “<br>” after “Title”.
Save the file, switch to the web browser and refresh the page. The Layout will be consistant reguardless of your browser’s window width.

HTML needs to know when to add line breaks. There will only ever be one space between rendered elements unless you tell the web browser what to do. Adding spaces(with the space bar) or Returns in HTML won’t do it.

Tables
Tables are similar to the columns and rows of excel:

An example of a table’s row

a table’s column:
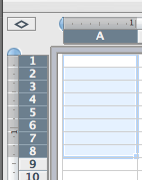
One rudimentary and reliable way to format your layout is to use tables.
Create a table by typing:

<table>
</table>

Our table will have 2 table rows signified by <tr></tr>

<table>
<tr>
</tr>

<tr>
</tr>
</table>

Our table had 2 columns. Columns are create when you add table data signified by <td></td>

<table>
<tr>
<td>
</td>
<td>
</td>
</tr>

<tr>
<td>
</td>
<td>
</td>
</tr>
</table>

Now add the content:

<table>
<tr>
<td>
NEXT »
</td>
<td>
</td>
</tr>

<tr>
<td>
<img src="images/TheNameOfTheFILE.jpg" />
</td>
<td>
<h1>Title</h1>
<p>Duis vitae sem sit amet mauris posuere laoreet. Sed et enim et ligula congue commodo. Vivamus molestie tellus nec augue. Suspendisse sit amet magna. Phasellus pellentesque ipsum.</p>
</td>
</tr>
</table>

Styling the Table Cells

We’re now going to add style elements to the table Cells to make it look more like our Photoshop Composition.

<html>
<head>
<title> Middlebury SlideShow </title>

</head>
<body background="#b0b2b4">
<table>
<tr>
<td>
NEXT >>
</td>
<td>
</td>
</tr>

<tr>
<td bgcolor="#000000">
<img src="images/TheNameOfTheFILE.jpg" />
</td>
<td bgcolor="#ebecec">
<h1>Title</h1>
<p>Duis vitae sem sit amet mauris posuere laoreet. Sed et enim et ligula congue commodo. Vivamus molestie tellus nec augue. Suspendisse sit amet magna. Phasellus pellentesque ipsum.</p>
</td>
</tr>
</table>
</body>
</html>

Refresh your browser and see how the layout is looking

Refining the Table
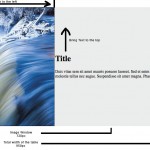
We Know the overall width of the table is to be 950px, and that the image view panel is 720px wide. so we will set these as well as the text alignment of the different cells:

<html>
<head>
<title> Middlebury SlideShow </title>

</head>
<body background="#b0b2b4">

<table width="950">
<tr>
<td align="right" width="720">
NEXT >>
</td>
<td>
</td>
</tr>

<tr>
<td bgcolor="#000000" align="center">
<img src="images/1.jpg" />
</td>
<td bgcolor="#ebecec" valign="top" style="padding:20px;">
<h2>Title</h2>
<p>Duis vitae sem sit amet mauris posuere laoreet. Sed et enim et ligula congue commodo. Vivamus molestie tellus nec augue. Suspendisse sit amet magna. Phasellus pellentesque ipsum.</p>
</td>
</tr>
</table>
</body>
</html>

Making links and adding pages

Please copy your document and name the new html file index2.html. Open index.html and change the NEXT >> to read: <a href="index2.html">NEXT >></a>

The “href” tag is followed by the document to be linked in quotes.

Go to your browser and refresh the page. You will see Next >> in blue. Click on the link. Since index2.html is a duplicate of index.html nothing will appear different except for the URL.

Open index2.html in Text Wrangler.

Change the image source reference and change the navigation from:
<a href="index2.html">NEXT >></a>
to
<a href="index.html"><< PREV</a> <a href="index3.html">NEXT >></a>

The HTML for index2.html should look like this:

<html>
<head>
<title> Middlebury SlideShow </title>

</head>
<body background="#b0b2b4">

<table width="950">
<tr>
<td align="right" width="720">
<a href="index.html"><< PREV</a> <a href="index3.html">NEXT >></a>
</td>
<td>
</td>
</tr>

<tr>
<td bgcolor="#000000" align="center">
<img src="images/2.jpg" />
</td>
<td bgcolor="#ebecec" valign="top" style="padding:20px;">
<h2>Title</h2>
<p>Duis vitae sem sit amet mauris posuere laoreet. Sed et enim et ligula congue commodo. Vivamus molestie tellus nec augue. Suspendisse sit amet magna. Phasellus pellentesque ipsum.</p>
</td>
</tr>
</table>
</body>
</html>