Author Archives: Michele Mondella

About Michele Mondella

Retail Associate In the Middlebury College Bookstore at the Apple Desk handling most Apple sales and questions. Dial 802.443.2038 for Questions.

Don’t Miss Out on the Apple Promotion!

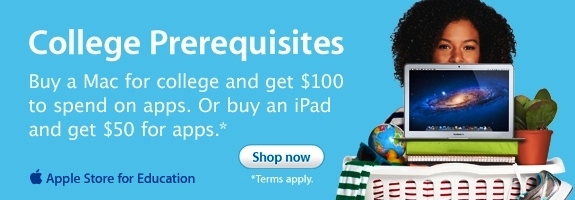
We are offering a FREE $100 Apple Back-to-School Gift Card with the purchase of a new Mac

or

get a FREE $50 Apple Back-to-School Gift Card with the purchase of the new iPad

We have all the latest models in stock, click the link or come in and check them out!

Tutorials for New Mac Users

Occasionally we get in those individuals who have never experienced Mac before and are looking at buying a laptop or an iPad.  They play with a Mac here in the store and feel like they are “In the Fog”.

There are a great many tutorials that are available to help you get used to the Mac world including the verbiage which is different than that of the PC and Windows world.  Almost daily, we have someone that needs help learning how to do this or that on the Mac or iPad.  I am creating a link for some basic Apple Tutorials below that are step-by-step instructions along with the video.

Apple Tutorials

Our Library and Information services has also provided a link to tutorials for Faculty, Staff and Students.  These tutorials are by Lynda.com and have been provided for Middlebury.  Simply click to link below to get to the LIS Helpdesk- Lynda at Middlebury information page, then click on the link go/lynda

These tutorials are for such a broad range of subjects that you can type in what subject you would like to learn in the search space provided at the top of the page.  So simply type in Mac and you will have a large list to choose from that are rated for beginners, intermediate or all.  You will then be able to select the Switching to Mac tutorial at the top of the list. Each tutorial is 2 to 3 minutes long within the selections for Switching to Mac. This allows you to learn in steps as time allows.

Lynda.com at Middlebury


OS X Mountain Lion Now Available

I just received news that the new Operating System for Mac is now available at the App Store.  You can access the link to the App Store by click on the picture.

For those individuals that just purchased a Mac on or after June 11, 2012, there is a free upgrade available.  Click the link below for your free upgrade.  Have the serial number and receipt handy when you access the link.

OS X Mountain Lion Upgrade

Resetting the Power Manager

Sometimes, when a new Power Adapter is purchased for a Mac, it stops working a few weeks after. Or when you borrow a friends Power Adapter and used it, then re-plug your own Power Adapter back in, you cannot get it to charge your  battery.  These can be very frustrating but, there is a simple solution to this quirky problem.  You simply have to reset the Power Manager Chip in your Mac.  Sounds much too complicated right?  Just follow the EASY step-by-step instructions below!

For a New MacBook Pro and MacBook Air  (with battery you cannot remove yourself):

  1. Shut  the computer off.
  2. Plug in the Power Adapter to an outlet, making sure it is then connected to the Mac.
  3. Press the Shift-Control-Option keys (all on the left side of the keyboard on the Mac) and the power button at the same time counting to 3.
  4. Then, release all the keys and the power button at the same time.
  5. Press the power button to turn on the computer.

For an older Mac (with batteries you can remove yourself):

  1. Shut the computer off.
  2. Disconnect the Power Adapter from the computer, if it’s connected.
  3. Remove the battery.
  4. Press and hold the power button for a full 5 seconds.
  5. Release the power button.
  6. Re-install the battery and connect Power Adapter to Mac.
  7. Press the power button to turn on the computer.

As long as your Power Adapter is not damaged like the end fraying, this quick fix may solve your problem.  Good luck!

Here is the link to purchase a new Power Adapter if this does not work.  Click on this  Apple Campus Store!


Changing the Language on a Mac!

This is the perfect time of year to learn how to change the language on your Mac. For students who are not allowed to read this in English, perhaps someone in each language school can translate this into the desired language and post in the classroom for the students.

  • You start by going into your System Preference, in your dock it looks like the gears of a clock. Or click on the Apple Logo at the top left and then select System Preference.
  • In System Preference, click on Languages &Text.
  • Under the language tab, you will notice a list of languages.  If you do not see the desired language, click Edit List below the list of languages.  Select the language you want to add to the list. Then, select the desired language from the list and drag it to the top of the list.
  • To see the change right away without logging out, click the red button to close Languages and Texts.
  • Click on the Apple Logo and click Force Quit Finder.
  • Select Finder and click on Relaunch.

Now you are ready to enjoy the summer at Middlebury Language School!


Welcome Language School Students!

We would like to welcome the Language School Students.  We also wanted to let you know about our Apple Campus Store, where you can find all you Mac needs as well as bring your Mac in for repair.  We have our Apple Authorized Tech here Mondays, Wednesdays and Fridays in the afternoon.

You will find the latest Mac’s here next week including the featured 15″ Mac with Retina Display.

Middlebury College Bookstore Apple Desk

 Tech Notes

 The Mac Corner:

Stop right now and ask yourself these two questions:

1) Is there anything on my Mac that would be a bummer to lose?

2) Is everything backed up and easily recoverable?

Almost every week and sometimes more than once in a week, one of you is coming to me with a Mac whose hard drive has suddenly & unexpectedly become completely unreadable. MOST of you do not have the things you care most for on there backed up and easily recoverable.

This is sad. I hate to give bad news. I hate to watch you crying at my desk having just lost your thesis, or worse, your questionably acquired gigantic music collection.

This is especially sad because, contrary to popular belief, it’s not expensive, hard, complicated, or a chore to back up.

I have a couple of suggestions. Do these right now, and there will be no more crying at my desk.

If you don’t have a backup hard drive, go get one. It’ll be around $100- $150.  Get one that’s bigger than your internal drive. For example, if you have a 250GB internal, get at least a 500GB backup drive. This leaves room for archival data, meaning you can go back and get something from last month, not just last night. Since Leopard (Mac OS X 10.5) Time Machine backup software has been free and already installed.

Just plug-in the drive and when asked “Do you want to use this drive with Time Machine?”

Say yes. That’s it.

Keep it plugged in as often as you can. If there’s a place you plug-in for the night, keep the drive there and plug it in.

Remember to eject it before disconnecting.

I have another idea.

Go right now to Dropbox.com and sign up for a free 2GB account. All you need is an email address and a password. Make up a good one. There’s a cute cartoon tutorial on the site and they’ll give you extra space if you watch it through. How nice. Download the app and install it. Now you have a folder in your home folder (right next to Documents) and anything you put in there immediately and with no interaction from you gets backed up to the web! No futzing!

It gets better. Refer a friend, get more free space.

It gets better. Download the app on your iPhone or Android, and you get all your files (that you save in the Dropbox) on your phone. Think PDF of travel itinerary: it’s on you. Nothing to print.

It gets better still. Share a folder from your Dropbox with a friend, colleague, work group, class, etc. It doesn’t matter whether they have Mac, PC, iPad, android. They open a file and make a change, bam. You have it already. No need to email it, keep track of versions & revisions. Everyone has the most recent copy. Two people open and change the same file at the same time? It could happen. Dropbox saves both. One, the usual way, and the other as “conflicted copy” with the date, so it can be sorted out.

It gets better still yet again. From the web, you can revert to previous versions, or undelete a file up to 30 days after it was deleted from your Dropbox.

Pretty sweet. Did I remember to say free? Yes, free.

Right now, move your Middlebury homework folder into your new Dropbox folder. Really. For someone reading this article, this will be the last day their hard drive works. Tomorrow they will turn it on and see only a flashing question mark in a folder, and an ugly click-click-click from under the right hand palm rest. The question is, will they be crying? Or will they walk up to my desk and say, “Here’s my Mac. It’s OK. I’ve got all my work available from any other computer.”

Directions for iCloud and Middfiles coming next time.