Have you ever wanted to add a nice glitch effect to your edit? Well you could do that by isolating RGB layers and doing a lot of keyframing, but no one wants to go through that hassle. Lucky for you, Adobe recognizes your plight and made an effect just for this!
VR Digital Glitch can be found in your effects tab, by going into
Video Effects → Immersive Video → VR Digital Glitch

What it should look like to find the effect in Premiere

This is what the effect should look like initially when dragged onto your clip.

A still without the effect
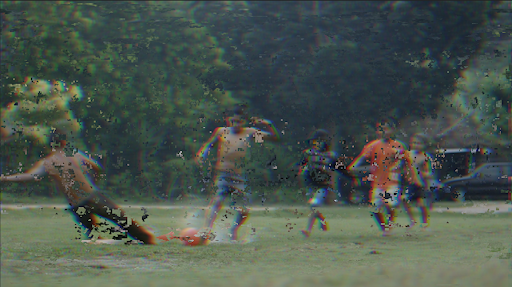
A still with the default VR Digital Glitch settings
Point of interest should be centered on your clip by default, and determines where the effect spreads out from. POI Scale tells you how “spread out” your effect will be over the clip. Finally, POI Aspect changes the shape of the effect over the clip. As with the rest of this explainer, it would be most helpful for you to play around with the values of the different sliders to get a better understanding as to what they do. Skipping over Master Amplitude, Distortion, and Noise we get Random Seed. Simply put, the seed will determine how the software chooses which points to distort and which points to leave intact. The seed should usually have no great impact on the look of your effect, other than changing which pixels get affected by all the other sliders.
Master Amplitude is on a scale from 0 to 100, and determines how strong the effect will be. The closer to 0 it is, the less pronounced the effect will be. At 0, you will just see your original clip unaffected. Let’s move into Distortion and Noise now.

Distortion tab once it is dropped down.
To begin with, Color Distortion will “slide out” the different RGB layers along the X axis. For a certain point, the value of Color Distortion determines how much to the left these layers are moved.

A frame with a value of 100 Color Distortion.
Geometry distortion X, Y, Z “stretches out” the pixels along the X, Y, and Z axes. The X axis is horizontal along the frame and the Y axis is vertical along the frame, as one would expect. Images are two-dimensional, but imagine that the Z axis crosses through the screen, perpendicular to the image. When distorting along these three axes, you are stretching out and amplifying the noise along the axis.
Distortion Complexity determines how finely you add this noise. It goes from 1 to 100 (the minimum is not zero here). At 1, Distortion Complexity gives you just a few, but massive, points of distortion. At 100, Distortion Complexity peppers in tiny distortion points all over the frame.

Distortion Complexity of 1

Distortion Complexity of 100
Distortion Rate is a factor that amplifies all your other distortion values. It acts like a multiplier for the strength of your different geometry distortion tabs.

Distortion Rate of 0

Distortion Rate of 100
Distortion Evolution and Color Evolution are counted in angles (go to 360 and then repeat, once you get past 360, say 375, it will be marked as 1×15 because you are 15 over 360. 720 would thus be 2×0. Since 0 and 2×0 look the same on a still, this is usually used for keyframing)
The final drop down tab, Noise, looks a lot like the distortion tab. You can change the noise strength, quantity, scale, and evolution. Noise is an added layer on top of your distortion, and is not affected by it. Color noise, if checked, transforms your noise from being black and white to color. Below are images with Noise Strength, Quantity, and Scale up to 100 to make them more clear to see.

Black and white noise

Color noise
You now know everything you need about VR Digital Glitch! Have fun using it in your edits, and mess around with it yourself to get an intuitive sense of how all these tabs work!