Tag Archives: Faculty and Staff
Great Sound with Beats!

New iPhone 6 and 6 Plus

Pre-order the iPhone 6 or iPhone 6 Plus Starting September 12th.
Get your new iPhone 6 or iPhone 6 Plus by Pre-ordering them on September 12th through our special Middlebury Apple Educational link.
Don’t miss out, they will go fast!
Hot News from Apple!

What do Jimmy Lovine (left) and Dr. Dre (right) have in common with Apple?
Jimmy Lovine and Dr. Dre signed on with Apple for an Apple acquisition of Beats Music. Apple now gets Beats Music, a streaming music service, along with the Beats Electronics brand headphones, speakers and cables with their unique look and the co-founders of Beats- Jimmy Lovine, music genius and Dr. Dre, rap superstar who will bring their talents to give Apple a new edge in the world of music.
 Apple will get a hot new look for their music accessories like the stylish headphones pictured here.
You will love the new music in the link provided below to Beats Music App. the best part about this App is that it is FREE!

Your Apple Desk here at the college in the Bookstore will be carrying the new look in sound.
New Lower Prices

Apple announced new lower prices on MacBook Air’s with a faster processor!
Our 11″ Models are now:
128GB $849.00
256Gb $1049.00
Our 13″ models are now:
128GB $949.00
256GB $1149
with Middlebury College Bookstore–
-your College ID gets you an additional $50 off those lower prices.
Apple Desk Quick Tip!

Saving Money!
Did you know that when you purchase a Panther Rewards Bookstore Gift Card for $250, $500, $750 or $1,000, your Gift Card comes with money added on it automatically- FREE? For instance, if you purchase a $500 Panther Rewards Gift Card, you get $15 added to it. You can then turn around and use this Gift Card to purchase an iPad Air (example) for that special someone and use that additional $15 as savings on the iPad!
Two wonderful things are accomplished with buying smart- first, you save money- bonus, then you are appreciated for your thoughtful gift- double bonus!
Buy smart, get savings with a Panther Rewards Gift Card.

MacBook Pro With Retina Displays are in!!

MacBook Pro Retina Display
Wow!
Come in and get your new 13″ or 15″ Mac with Retina display. The new 13″ Mac with Retina Display now comes in three choices.
- MacBook Pro 13-inch with Retina Display: 2.4GHz Dual-core Intel Core i5, 128GB $1,199.00
- MacBook Pro 13-inch with Retina Display: 2.4GHz Dual-core Intel Core i5, 256GB $1,399.00
- MacBook Pro 13-inch with Retina Display: 2.6GHz Dual-core Intel Core i5 512GB $1,699.00
The new 15″ comes in these choices.
- MacBook Pro 15-inch with Retina Display: 2.0GHz Quad-core Intel Core i7 256GB $1,899.00
- MacBook Pro 15-inch with Retina Display: 2.3GHz Quad-core Intel Core i7 512GB $2,399.00
Apple Quick Tips

What to Do When your iPad, iPhone or iPod is disabled
We recently had someone, a bored students perhaps, come in and create a passcode on our Demo iPod which locked every customer out who was looking at the iPod’s. After so many tries of entering the passcode, the iPod then became disabled which allowed no one to open it. How annoying for customers. But, the good news is that there is an easy fix for anyone who has a passcode on their iPad, iPod or iPhone and was locked out.
The first thing you should realize though is this–
This process completely wipes your device clean and restarts it. What this means is that any and all of your music, movies and all other data is wiped as well. Make sure your have all this saved on your Mac/PC before anything like this happens if possible. iCloud is definitely the preferred choice, then you can just restore your device from iCloud. The very least you should make sure of is that you have synced your device with iTunes which can perform the restore as well.
However, if you have never synced your device with iTunes and you’re not using the benefit of the iCloud, you can perform this easy trick to unlock your device without restoring data. It will be like a new device.
First– Shut your device off.
Second– Open iTunes on computer.
Third– Get your charging cable plugged into your computer through the USB port.
Next– Hold down Home Button (Without Releasing) while plugging the other end of charging cable into device. Look for “Connect to iTunes” that appears on device before finally releasing Home Button.
Then– Look for “Device in Recovery Mode” in iTunes on computer, then click ok and restore device.
Below is an Apple Support link that can help walk you through restoring and resetting a passcode with iCloud if you used it to back up.
Apple Quick Tip- Airport Wi-Fi

A new problem arose after one of our customers purchased an Airport Base Station for Wireless Networking in their home. They followed the included Manual Instructions which did not call for getting this setup started using your Mac which turned out to be a missing key component for getting it set up correctly. Below is a link to Apple Support for a tutorial slideshow on how to set up your wireless network.
Apple Support – Wi-Fi Slideshow
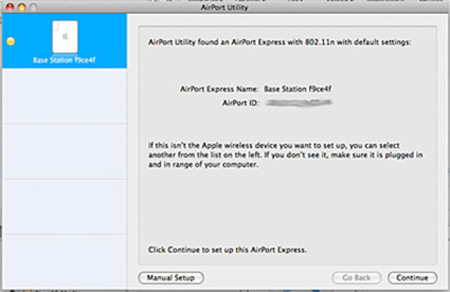
The first step of course is to turn your Mac on! Then plug your Airport into the outlet and open up Airport Utility by opening Finder from your dock. Scroll down on right and open Utilities. A window will appear and looks similar to this one above.
Select the correct device by making sure it is highlighted and continue
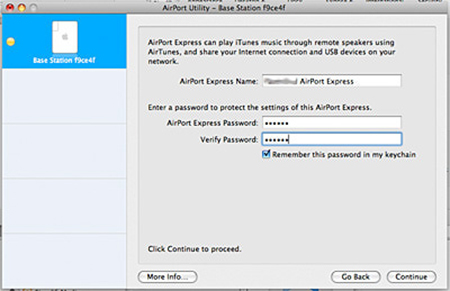
You are then given the chance to individualize your Airport device by creating a name along with a password to protect your Wi-Fi with security.

Select which set-up you want from the choices of extending your Wi-Fi Zone, replacing it or creating a new one or secondary one. Then continue.

Then, choose your wireless network which may be made easier by showing the name created for it previously. Continue.
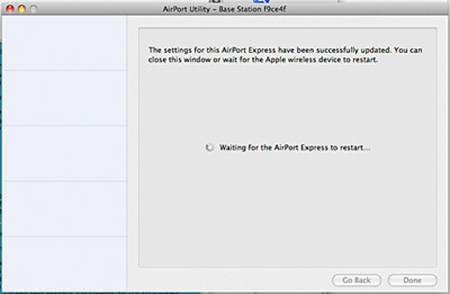 Congratulations! Click done, your Airport Device is activated.
Friday Apple Quick Tips

Helping you through your nightmares of printer issues…
…like adding a new printer.
We recently had a case where a student could not get her Mac to recognize her printer. A student who has deadlines for handing in papers is desperate and frantic the day before the deadline. You will find these helpful hints to be a good source when you are installing a new printer preferably before that deadline is upon you.
Before you get started on adding a printer – view link below!
Below are some helpful Apple Support Links to checkout.
Recommended Wi-Fi Printer settings
First and foremost when shopping for a new printer- make sure it is compatible with Mac OS X.
After your well thought out purchase -Before doing anything else, read printer manual, then read it again. Now you are on the road to becoming mentally prepared to install your printer.
Studiously follow the printer instructions by turning printer on and installing ink cartridges, adding paper as well as connecting printer to Mac. With Lion and Mountain Lion OS X, you may get a Dialog Box letting you know if your Mac wasn’t able to install a driver if recent updates have been made and new software must be downloaded. It is at this point that you may have discovered one hiccup installing the printer- so face it right now – The software for installing your new printer is probably out of date!
That said, now you know you may have to go to your Mac’s browser and look for your printer (make and model) Driver which will take the place of the outdated installation CD or downloaded software. This driver is the printers installation updated software. First try using the Apple Support link provided below to get that software. If this is not helpful- below the link are the manual installation directions for printer drivers.
Apple page for Printer software
- · You will type in the name of your printer-for instance- Hewlett Packard, Canon, etc. And then the model precisely as it is seen- Deskjet 3050A or PIXMA MG3122 etc., then use the word Driver. For instance- Search HP Deskjet 3050A Driver or whatever your printer is and look for the manufacturer’s support for printer driver.
- · Once you find the manufacturer website, you may have to select which printer model you have or select driver if offered to select.
- · Then make sure you know which Mac OS X operating system you have, Snow Leopard 10.6, Lion 10.7 or Mountain Lion 10.8. then click download.
After you get that software downloaded onto your Mac which may not automatically open up, select that download to open and choose installation and go through the steps it directs you to. You may have to refer to the Apple Links above for adding wireless printers.
Check to see if your printer is ready- open System Preference and look in Print & Scan for your new printer. Follow Printer’s manual instruction and print out something for a test.
You should be good to go.