Learning Goals
- Perform a titration and analyze the uncertainties associated with titrations;
- Employ a color pH indicator;
- Apply stoichiometry to analyze titration data;
- Observe an acid-base reaction.
by S. Choi, R. Gleason, and K. Jewett (with edits by R. Sandwick and M. J. Simpson)
Introduction
Citric acid is a polyprotic acid (can release three H+s) that is a bit on the weak side (i.e., tends not to ionize completely). In solution in fruit juices, it lets a small portion of the H+ go, however this small amount of acid is enough to create a pH = ~3 solution and a sharp taste on the palate. If strong base is added to citric acid it will sequentially lose its three protons in the following manner:
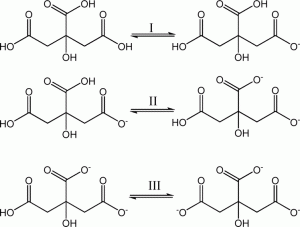
Citric acid deprotonation in 3 steps. Credit: CrystEngComm, 2014,16, 3387-3394
Background
In today’s experiment we are going to determine the amount of citric acid in a fruit juice by using a base-acid reaction. If we know exactly how much base we add to completely remove all the H+ ions (called “deprotonating”) from the citric acid in the juice, we can calculate how much citric acid is in the solution. This process of employing one reagent of known concentration to determine a compound of unknown concentration in solution is termed titration. It usually involves slowly adding small amounts of the titrant to the analyte until a reaction is just barely complete. The apparatus typically used is a buret. The equivalence point (or end point) is the exact point where all the analyte in solution has reacted. Since the equivalence point of many titrations do not result in observable changes, end point indicators are added to (are you ready for this?) indicate the end point.
In this experiment you will use a solution of NaOH to titrate the acid in a fruit juice. To be accurate, the exact concentration of the NaOH solution you prepare must be known. Powdered NaOH (from which you will make your solution) is known to slowly decompose upon reaction with CO2 in the air to generate NaHCO3. Thus you will need to standardize, or precisely determine the concentration, the NaOH solution using a stable primary standard. Only after you have satisfactorily determined the exact concentration of your NaOH solution can you accurately determine the citric acid concentration in the fruit juice.
There are several good primary standards for standardizing base solutions, but one of the best and cheapest is the compound oxalic acid dihydrate, H2C2O4 ● 2 H2O. (Oxalic acid is a natural acid found in rhubarb leaves; it is toxic so don’t eat it.) It is important to note that the chemical equation (shown below) shows a stoichiometry of one moles of oxalic acid to every two mole of NaOH in this reaction.
H2C2O4(aq) + 2 NaOH(aq) → C2O42-(aq) + 2 Na+(aq) + 2 H2O(l)
The indicator we will use in both is phenolphthalein, a common indicator of acid-base titration. Phenolphthalein was the active ingredient in Ex-lax until recently when it was phased out due to its carcinogenicity.
Procedure
Note: do this lab with a partner.
Standardization of a Solution of Sodium Hydroxide
- Thoroughly clean and rinse with distilled water your supplies: a burette, a 25-mL graduated cylinder, a 500 mL boiling flask, and three 250 or 300-mL Erlenmeyer flasks.
- Put your NaOH pellets (mass calculated in the pre-lab) in the 500 mL boiling flask. Cover them with a small amount of water and swirl until they dissolve. The heat of solution produced by the NaOH helps to speed the dissolving process. Once the pellets are dissolved, fill the flask to the base of the neck. Using Parafilm, mix the solution thoroughly by inverting several times (the flask not you!). It is best to keep the flask covered with Parafilm when not in use as CO2 from the air can slowly neutralize the NaOH.
- Using an analytical balance, weigh out the oxalic acid dihydrate in a weigh boat (mass calculated in the pre-lab). Place it in a clean, clearly labeled Erlenmeyer flask. Note: It is not necessary to weigh out exactly the amount calculated (although you should be close), however it is imperative that the mass of each sample of oxalic acid dihydrate be known precisely for each flask. Label each clearly.
- Dissolve the oxalic acid dihydrate in 25 mL of distilled water and add three drops of phenolphthalein indicator solution.
- Repeat steps 3 and 4 for 2 more samples of oxalic acid dihydrate so you have a total of 3 flasks containing oxalic acid solutions.
- Rinse your buret once with water and then twice with 5-mL portions of the solution of sodium hydroxide which you have prepared, draining the solution off through the burette tip into a beaker for waste reagents. Fill the buret nearly to the top of the graduated portion with the solution of sodium hydroxide you have prepared, making sure that the buret tip is completely filled with the solution. Touch the inner wall of a beaker for waste reagents to the buret tip to remove any hanging drop of solution.
- Make a preliminary titration using one of your solutions of oxalic acid to learn approximately how the neutralization proceeds. Place a sheet of white paper under the Erlenmeyer flask so that the color of the solution is more easily observed. Make sure to either adjust the meniscus to the 0.00 mL line or record the exact volume to the nearest 0.05 mL. Swirl the sample in the flask throughout the titration. Add sodium hydroxide rather rapidly from the buret until the color of the solution where the sodium hydroxide is entering the solution begins to linger, then add the base dropwise until, finally, one drop of the alkaline solution of base changes the colorless solution to a permanent pink, not red. A drop should not be left hanging on the buret tip. You probably will overrun the endpoint in this first titration, but it will provide a useful rough measure of the volume of the sodium hydroxide solution needed to neutralize the acid and provide you with valuable experience. Read and record the level of the meniscus in the buret (to the nearest 0.05 mL), and compute the volume of basic solution used in the titration.
- Now titrate the remaining two samples of standard acid, being certain each time to refill the burette nearly to the top graduation with your sodium hydroxide solution and to record the burette reading. In these runs, add the sodium hydroxide from the buret very rapidly, again with swirling, until you are ~ 2 mL short of the volume that you estimate will be needed on the basis of your first titration. Then carefully add base drop by drop so that you can determine the equivalence point accurately. Record the data for your titrations in a table and perform the calculations necessary to yield the exact molarity of the NaOH solution. Show your results to your instructor. The concentrations of your titrations should agree within 5 % of each other.
- The solution of sodium hydroxide that you have just standardized will be used in Part II, so do not waste it.
Total acidity of a citrus fruit
Several different types of samples will be available for you to use. When using fruit, squeeze the juice into a 250-mL beaker by cutting the end from the fruit and applying pressure. Use a Büchner funnel and filtering flask to vacuum filter the juice to remove the pulp. If you are using one of the juice samples, simply use the juice as is. Deliver 5.00 mL of juice (or 2.00 mL if its highly acidic) into a tared 250 or 300-mL flask (you’ll need to reuse one from the previous part of the experiment). Weigh the tared flask and its contents to the nearest 0.0001 g and then dilute the juice to approximately 50 mL with distilled water. Add three drops of phenolphthalein indicator.
Titrate the prepared juice solution to the phenolphthalein endpoint. Record the final burette reading to the nearest 0.05 mL. Repeat the experiment until you are satisfied with the precision of successive runs. Put all data into an appropriate table.
All waste can go down the sink drain.
Calculations
Calculate the moles of oxalic acid reacted, the moles of NaOH titrated, and the molarity of the NaOH.
Having discovered the exact molarity of the NaOH you used, calculate the number of moles of citric acid in each sample. Convert this to grams and then to grams citric acid per grams sample. Convert this to a percent citric acid by weight.
The reaction of sodium hydroxide with citric acid is:
3 NaOH + H3C6H5O7 → 3 Na+ + 3 H2O + C6H5O73-
Report
Fill out the worksheet for the report. Look up values for citric acid concentration in juices and compare your value vs. those literature values. Give a proper citation for the source.