Learning Goals
- Use bomb calorimetry to measure heat of reaction;
- Use a thermometer and analyze the limitations of thermometry;
- Observe changes in phases of matter and consider the challenges associated with volatile substances;
- Apply the ideal gas law and analyze the limitations of using the ideal gas law in an experiment;
- Synthesize a simple procedure and a data table to collect experimental data;
- Choose a follow-up experiment based on initial results;
- Write a conclusion based on a specific prompt and tabulate results to support the conclusion.
Ideas for portions of this lab were drawn from the University of Pennsylvania Laboratory Program for Chem 53, accessed at this webpage: http://www.sas.upenn.edu/~kennethp/chemlab1.pdf, and the University of Calgary Laboratory Program for Organic Chemistry, accessed at this webpage: http://www.chem.ucalgary.ca/courses/351/laboratory/boilingpoint.pdf.
Introduction
https://qph.ec.quoracdn.net/main-qimg-4161e9231033aa335aca697a3ef0c4e2
In many ways, chemistry can be a puzzle: since you cannot see atoms directly, you must instead collect as many pieces of data as you can and put them together to get the best possible answer. In this lab, you are tasked with identifying an unknown volatile liquid.
First, you will measure the molar mass of the liquid using the ideal gas law, but is the molar mass enough information to identify an unknown? How much uncertainty is associated with the molar mass measurement, anyway? If you were publishing a paper and wanted to convince the scientific community that you have identified a liquid, measuring the molar mass would surely not be enough information!
As additional pieces of evidence, you will measure the density in the liquid state, the boiling point, and the heat of combustion. These four pieces of evidence should pinpoint the exact identity of the liquid with enough certainty to convince even the most skeptical audience, who is hopefully yourself.
When you think you know the identity of the unknown, you can run a confirmatory test.
Background
What is a volatile liquid?
A volatile liquid is a liquid that vaporizes readily under normal conditions. Many volatile liquids have a noticeable smell because they vaporize into your nose! Throughout this lab, you will be working with a volatile liquid. When it is warm, it is mostly a gas, and when it is cool it is mostly a liquid. Note that you will be measuring the density of the substance in both the liquid and the gaseous state, but you will find that the tendency of the volatile liquid to vaporize and condense introduces uncertainty in both of these measurements.
Measuring molar mass from density of the gaseous state
The ideal gas law provides a way to relate the number of moles of a gas to the volume of the gas: n/V = P/RT
If you are also able to relate the number of grams of the gas to the volume of the gas (g/L, in other words, density), then these two formulas together allow you to then relate the number of grams of the gas and the moles of the gas, which is the molar mass: molar mass = (density)RT / P.
Your textbook shows a more detailed derivation in Section 8.3.
In this lab, you will measure the density of a volatile liquid in its gaseous state, the pressure, and the temperature, and this will allow you to calculate the molar mass. To measure the density, you will need to measure the mass and volume of a gas. The procedure will guide you through forming the gas and measuring the mass, but you must design your own method of measuring the volume of the gas. Be creative! Try to get as many significant figures as possible.
Heat of combustion
This is a topic you have not yet covered, but you will soon! Here is a simple explanation of what you need to know for this lab:
The heat of combustion is the amount of energy released when a given amount of a substance is burned in the presence of excess oxygen. Normally this value is reported in terms of energy per mole of the substance, but because we do not yet know the molar mass of the liquid, we will measure it in terms of energy per gram of the substance and compare it to the list of possible sample identities at the bottom of this page, also in those units, in order to identify the liquid.
Density of the liquid state
You should be very comfortable measuring the density of a liquid. You just need the mass and the volume: density = mass/volume. You will be comparing the density of your liquid to the list of possible sample identities at the bottom of this page to help you identify the liquid.
Refer back to Lab 1 for a refresher on density measurements.
Boiling point
Boiling point is the temperature at which a substance changes from a liquid state to a gaseous state. Boiling point is actually a function of pressure, but because most people measure it under atmospheric pressure, it is typically reported at 1.000 atm (1013 mbar). If you notice that the atmospheric pressure on the day of your measurement is greater than or less than 1013 mbar, know that this will contribute to a discrepancy between your results and the literature boiling point values.
Procedure
Note: do this lab with a partner. There are five parts to this lab, which will be done over two weeks. I suggest doing part 1 on the first week and parts 2-5 on the second week, although you may chose to do parts 2 and 3 whenever it is convenient. Be sure to use the same thermometer throughout the experiment.
1. Measuring molar mass from density
Thermometer calibration
At some point, you probably had this thought but were afraid to say it out loud: “are these thermometers right? I always thought water boiled at 100 °C, but it looks like this water is boiling at 105 °C. I don’t know, maybe I’m reading it wrong?” If you have had this thought, then pat yourself on the back for being observant. The alcohol thermometers are not perfect, and to get a reasonably accurate temperature measurement with them, you will need to calibrate them. Since we are making most of our temperature measurements in this experiment near 100 °C, we will calibrate at 100 °C.
Bring a beaker of tap water to a rolling boil over a bunsen burner. It doesn’t matter what size beaker and exactly how much water, but a 600 mL beaker about 3/4 filled with tap water would be a great choice. Once boiling, place your thermometer into the water. Hold it or clamp it so it doesn’t touch the bottom or sides. When the temperature is stable, record the “thermometer calibration temperature” to the nearest 0.2 °C in Table 1.
You can now calculate the offset for your individual thermometer.
100.0°C – “thermometer calibration temperature”(°C) = thermometer offset (°C)
This number may be positive or negative. Use a piece of label tape to label your thermometer with its thermometer offset. From now on, factor that offset into your temperature measurements before recording them in your data table. Keep that calculator handy!
As an example, let’s say your thermometer calibration temperature is 105.0 °C.
100.0°C – 105.0 °C = -5.0 °C
Now you know to subtract 5.0 °C from every temperature you measure throughout the experiment. If your thermometer reads 92.2 °C, then record 92.2 °C – 5.0 °C = 87.2 °C.
Pressure
Record the barometric pressure of the atmosphere in Table 1. If you have reason to believe the pressure is changing throughout the experiment (maybe there is a hurricane outside?), check it before beginning every trial, but normally checking at the beginning of the experiment is sufficient.
Mass and temperature
Use the same 125-mL Erlenmeyer flask throughout this section. Dry the Erlenmeyer flask thoroughly. Measure the mass of the 125-mL Erlenmeyer flask with an Aluminum foil cover secured with a rubber band. Trim the Aluminum foil cover to right below the rubber band. Record the mass of the covered flask in Table 1. Make a tiny hole in the foil cover with a thumbtack.
Set up a hot water bath with a 600 mL beaker about 3/4 filled with tap water, similar to the one shown: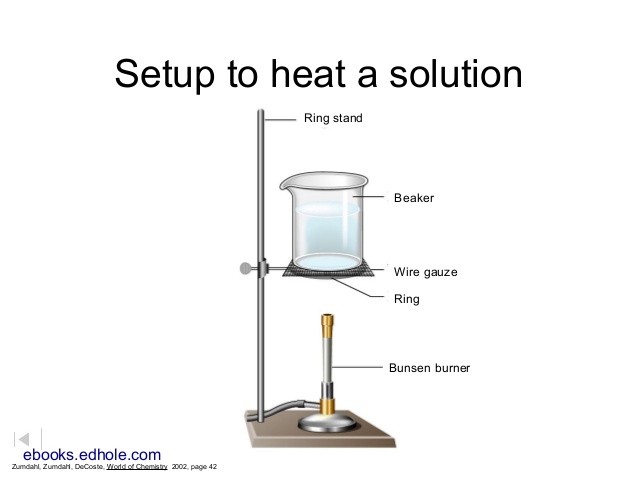
Bring the water to a boil over a blue bunsen flame.
While the water begins to heat, remove the foil cover and rubber band, place about 2 mL of the volatile liquid from the small bottle into the Erlenmeyer flask, then replace the foil cover and rubber band.
Turn off the flame. Submerge the covered Erlenmeyer flask up to its neck in the hot water, and use a clamp to attach it to the ring stand. Add more water if you need it to cover the flask up to the neck, but try not to get the aluminum foil wet.
Also, submerge a thermometer in the water, and use a clamp to attach it to the ring stand.
Monitor the temperature of the water to ensure it stays around 90 °C (don’t forget to factor in your calibration offset). Turn on the flame if the temperature drops below 80 °C. Maintaining this temperature, watch the vapor escape through the pinhole. Watch for the vapor to stop escaping through the pinhole and for visible condensation in the flask to disappear (tendrils dripping down the sides of the inside of the flask). This should take no more than 10 minutes. If you continue seeing condensation after the first 10 minutes, turn up the heat because your thermometer may be reading low. You can verify that the vapor has stopped escaping by holding a small watch glass over the pinhole and seeing that no condensation develops right above the pinhole. As soon as the vapor stops, record the temperature of the hot water bath to the nearest 0.2 °C in Table 1. Be sure to factor in the calibration offset!
Remove the Erlenmeyer flask from the hot water bath, but keep the cover on. Be sure all of the liquid has vaporized. If there is visible liquid, put it back into the hot water bath for a few minutes. Dry the outside of the flask completely. Then, measure the mass of the covered flask with the vapor inside (it may condense back to a liquid). If the mass is not stable, let it cool longer. Record the mass in Table 1. Expect a mass around 0.2 g. Consider re-doing the trial if your mass is much lower or higher.
Repeat this procedure two more times for a total of 3 trials. You may reuse your hot water bath. You must use the same 125-mL Erlenmeyer flask every time, but make sure you dump out the gas and any condensation before weighing the flask empty. If your aluminum foil gets wet, then you should use a new piece.
Volume
Measure the volume of your Erlenmeyer flask using your method, your partner’s method, or a combination of the two. If you need to measure the mass of the water in the flask, be sure to use a high capacity balance such as the CPA324s, which measures up to 320 g. Try not to spill water on the balances. Be sure to clean it up if you do. Record your data in Table 2.
2. Heat of combustion
When it is your turn to use the bomb calorimeter, begin by preparing your sample for analysis:
The experimental sample – this is a clean sample cup with 1.00 g of the volatile liquid inside. Record the exact mass of the volatile liquid in a tared sample cup in Table 3. Cover the sample cup with a piece of parafilm immediately after recording the mass of the sample to ensure none of the sample evaporates.
Your instructor or TA will walk you through measuring the heat of combustion for the sample. You will need the mass of the liquid in order to operate the bomb calorimeter. Record your results in Table 3.
3. Density of liquid state
Use a clean, dry 100 mL volumetric flask with a ground glass stopper for this experiment. How many significant figures do you get? Ask if you are not sure.
Measure the mass of the empty volumetric flask and stopper. Record the data in Table 4.
Fill the volumetric flask exactly to the point where the bottom of the meniscus is on the ground line with the volatile liquid from the bottle labeled “use for density of liquid experiment.” Cover the flask immediately to ensure none of the liquid escapes.
Measure the mass of the filled volumetric flask and stopper. Record the data in Table 4.
4. Boiling point
I will provide a demonstration apparatus for this rather complex set-up, but this is a description of how to build it:
Use the same thermometer that you previously calibrated. If you aren’t sure it is the same one, repeat the calibration procedure and record the offset. Gently push a thermometer through a split rubber stopper. Push the stopper up past the 100 °C mark so you can read temperatures below this mark.
Secure a 5 or 10 mm glass test tube to a thermometer with a rubber band. Be sure not to cover the temperature marks too much; temperatures below 30 °C are probably fine to cover. Make sure the bottom of the thermometer and bottom of the test tube are lined up together.
Use a bunsen clap attached to the rubber stopper to secure the thermometer/test tube apparatus to a ring stand.
Pour about 1 mL of the volatile liquid into the test tube. Drop a boiling chip in the test tube. Then, drop a capillary tube open end down into the test tube, as shown in the illustration. CAUTION! These volatile liquids are all flammable. Keep it away from open flames.
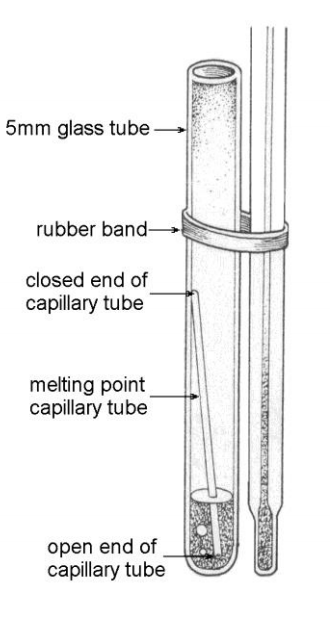
http://www.chem.ucalgary.ca/courses/351/laboratory/boilingpoint.pdf
Below this apparatus, you will need to make a hot water bath. Attach an iron ring to the ring stand about an inch above a bunsen burner, which is connected to the gas with amber tubing. Place a wire gauze on it. Place a 250 mL beaker filled 3/4 of the way with water on the gauze.
Lower the thermometer/test tube apparatus into the water bath, making sure to submerge the volatile liquid completely but allowing sufficient space above the water to ensure no water splashes into the test tube.
Turn on the gas and ignite the bunsen burner. Heat up the water nearly to boiling. Watch the test tube carefully. At first a few bubbles will come out of the capillary tube, but eventually you will see a steady stream of bubbles coming out of the capillary tube. When you see a slow, steady stream of bubbles, turn off the bunsen burner and allow it to cool. Your thermometer should read at least 85 °C before you turn off the flame (that temperature is above all of the possible boiling points). While it is cooling, watch the capillary tube. When you see it start to draw the volatile liquid up into the capillary tube, record the temperature as the boiling point. Be sure to record the temperature to the nearest 0.2 °C. You might miss it if you aren’t watching carefully the whole time it is cooling because it gets slurped up like a straw very quickly. IMPORTANT: be sure to factor in the offset that you found in Part 1 when recording the boiling point temperature. Record data in Table 5.
Repeat for 3 trials total. If three trials do not agree within 3 °C, consult your instructor or TA about performing additional trials. If necessary, refill the test tube and/or hot water bath between trials. Extinguish the flame before refilling or otherwise handling the volatile liquid.
5. Confirmatory test
Once you have completed your calculations and think you know the identity of the unknown, present your answer to the instructor or TA. She will provide a confirmatory test that you can use to validate your answer (or not!). Instructions for your test will be available at that time. Record the name of the test you used and the result. If the first test is negative, you may try a second test.
Calculations
You can now calculate the molar mass of the unknown from the density of the gas. Then, compare the molar mass, the heat of combustion, the boiling point, and the density of the liquid state of the unknown to corresponding data from known substances. Use these results to select the identity of your unknown from this list of possible unknown liquids:
-
- Benzene – carcinogen found in gasoline
- Molar mass = 78.11 g/mol
- Heat of combustion = 9.992 kcal/g
- Density of liquid = 0.876 g/mL
- Boiling point = 80 °C
- Hexane – common organic solvent derived from crude oil
- Molar mass = 86.18 g/mol
- Heat of combustion = 0.452 kcal/g
- Density of liquid = 0.659 g/mL
- Boiling point = 68 °C
- Methanol – wood alcohol, causes blindness when consumed in moonshine
- Molar mass = 32.04 g/mol
- Heat of combustion = 5.410 kcal/g
- Density of liquid = 0.792 g/mL
- Boiling point = 65 °C
- Ethanol – grain alcohol, white lightning
- Molar mass = 46.07 g/mol
- Heat of combustion = 7.086 kcal/g
- Density of liquid = 0.789 g/mL
- Boiling point = 78 °C
- Acetone – nail polish remover
- Molar mass = 58.08 g/mol
- Heat of combustion = 7.360 kcal/g
- Density of liquid = 0.791 g/mL
- Boiling point = 56 °C
Report
Fill out the worksheet for the report.
- Benzene – carcinogen found in gasoline